Lab 03: Launch the workbench
You’ll clone the team’s workspace repo, start the IIC-OSIC-TOOLS container, open its desktop in your browser, and run the smoke test. Then you’ll restart the container and check which of your files survived. When the smoke test prints === All checks passed === after that restart, your setup is ready for every later course.
Other courses link here for their workbench setup, so if one of them sent you, do this whole lab and then go back to that course.
Before you start
You need git and Docker on your laptop. In a terminal there, run:
git --version
docker run --rm hello-world
The first should print a version number, and the second a paragraph starting with
Hello from Docker!. If git is missing, do Lab 01 first. If Docker isn’t installed, do Lab 02. If it’s installed but the command fails, Docker may still be starting: wait until Docker Desktop shows Engine running and try again. If it still fails, or you run Docker Engine on Linux without Docker Desktop, see Troubleshooting.On a Mac, give Docker Desktop at least 4 GB of RAM under Settings → Resources (Lab 02, Part 1).
Have roughly 15 GB of free disk and a stable network connection, because the first launch downloads an image that is several GB in size.
Time: 30 minutes to 1 hour, most of it waiting for the first download.
Part 1: Clone the workspace
Open a terminal on your laptop.
Run:
git clone https://github.com/uoftasic/workspace.git
cd workspace
The first command creates a folder named
workspaceinside the folder your terminal is in, and puts the team’s scripts and configuration in it. The second moves your terminal intoworkspace. Remember which folder you ran this in, because you’ll run the laptop commands in Parts 2 and 5 from insideworkspace, and later courses start the workbench from it too.
You should see git print Cloning into 'workspace'... and finish without an error. If you get git: command not found, go back to Lab 01. If git says fatal: destination path 'workspace' already exists, you’ve already cloned it in this folder, so run cd workspace and use that clone.
Part 2: Start the container
From inside
workspace, start the container.On macOS or Linux:
./scripts/start_vnc.shOn Windows, run it from Windows Terminal or PowerShell:
scripts\start_vnc.batYou can also double-click
scripts/start_vnc.batin File Explorer, but the window may close when the script ends, before you can read what it printed.Wait for the script to finish. The first run downloads
hpretl/iic-osic-tools:2026.08and can take several minutes.
You should see the script end with a block that starts === Open in your browser ===, followed by the desktop’s address and password.
If the script fails because port 80 is in use, start it on another port (on macOS or Linux, HOST_PORT=8080 ./scripts/start_vnc.sh) and use http://localhost:8080/ in Part 3. Other failures are in Troubleshooting.
Part 3: Open the desktop
In your browser, go to http://localhost/, or
http://localhost:<HOST_PORT>/if you set a port in Part 2.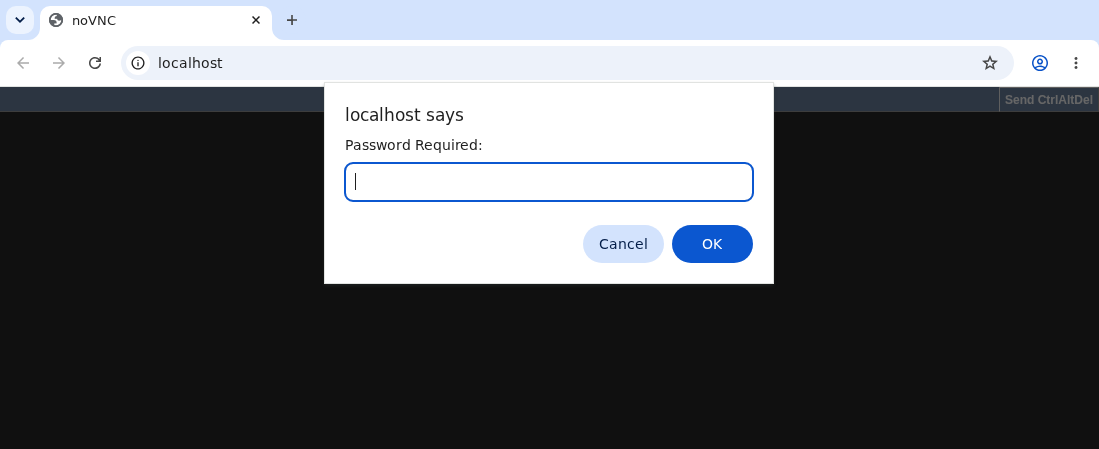 The address bar shows plain
localhost, which means the default port, 80. WithHOST_PORT=8080it would showlocalhost:8080.Enter the password the script printed:
abc123, unless you changed it withVNC_PW(Settings you can change).
You should see a Linux desktop with a column of icons down the left, including Terminal, XSchem and Magic.
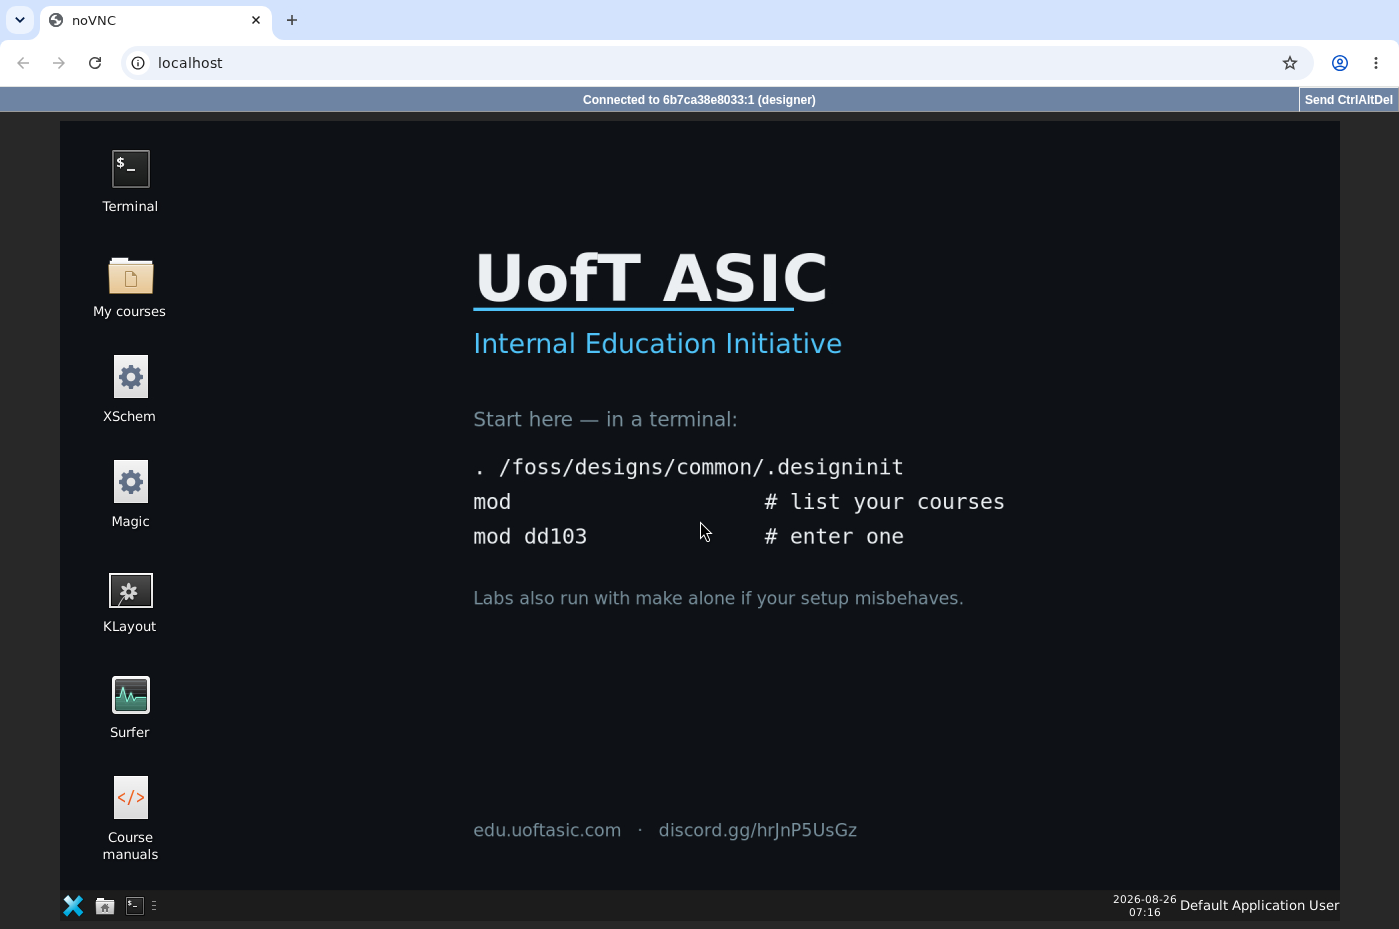 The desktop, running inside the browser tab.
Connected to ... in the top bar means the VNC session is live. Every later course that uses the tools runs on this machine.
If the page is blank or won’t load, wait 30–60 s and reload. If it’s still blank, see Troubleshooting.
Part 4: Run the smoke test
Every command in this part runs in a terminal inside the noVNC desktop, not on your laptop. Inside the container, your workspace folder is /foss/designs.
Open Terminal from the icons on the left of the desktop. To paste a command from this page into it, press Ctrl+Shift+V, or use the clipboard icon in the noVNC sidebar. Plain
Ctrl+Vdoesn’t paste into the desktop.Load the workspace environment:
. /foss/designs/common/.designinit.designinitpoints the tools at the SKY130 PDK and defines themodcommand you’ll use in steps 4 and 5. The.and the space after it are part of the command, because the.is what loads the file into this terminal.You should see:
ASIC-EDU: PDK=sky130A  PDK_ROOT=/foss/pdks  designs=/foss/designs
          run 'mod' to list course modules, or 'mod <name>' to enter one.
A new terminal on the desktop loads this file by itself, so you may already have seen these two lines when the terminal opened. Running it again does no harm, and it’s also the fix if a terminal ever says
bash: mod: command not found.Run the smoke test:
/foss/designs/scripts/smoke_test.shYou should see the same two
ASIC-EDUlines, then:=== ASIC-EDU workspace smoke test === OK ngspice OK xschem OK magic OK netgen OK yosys OK PDK sky130A at /foss/pdks/sky130A ngspice-47 --- module helpers --- OK mod function loaded OK add_module.sh present OK mod lists ic101_setup OK mod ic101_setup === All checks passed ===The indented
ngspice-47line is the ngspice version. If any line saysFAILorWARN, see Smoke test: tool or helper not found or Smoke test: PDK is not sky130A.List the course modules:
modYou should see
Available modules:and, under it,ic101_setup.Go to IC101’s scratch folder:
mod ic101_setupYou should see
cwd: /foss/designs/modules/ic101_setup.
Part 5: Restart the container
Step 3 below is how you stop the workbench, and steps 4 and 5 are how you start it again at the beginning of every later session. Before you restart it, you’ll save two test files and predict which of them the restart keeps.
In the desktop terminal, save one file in your workspace and one in the container’s
/tmpfolder:echo "saved in the workspace" > /foss/designs/modules/ic101_setup/restart-test.txt echo "saved in the container" > /tmp/restart-test.txtWrite down which of the two files you expect to find after you remove the container and start a new one.
In a terminal on your laptop (not the desktop), stop and remove the container. The launch script named it
asic-edu-osic:docker rm -f asic-edu-osicIt prints the name,
asic-edu-osic, when the container is gone.From inside your
workspacefolder, start the container again as in Part 2:./scripts/start_vnc.shon macOS or Linux,scripts\start_vnc.baton Windows. This time the image is already on your computer, so there’s nothing to download.Reload http://localhost/ (or your
HOST_PORTaddress), enter the password, and open Terminal from the icons on the left. If the page is blank, wait 30–60 s and reload, as in Part 3.Look for both files:
cat /foss/designs/modules/ic101_setup/restart-test.txt
cat /tmp/restart-test.txt
Run the smoke test again:
/foss/designs/scripts/smoke_test.sh
In step 6 you should see the workspace file’s text, then an error for the /tmp file:
saved in the workspace
cat: /tmp/restart-test.txt: No such file or directory
In step 7, the smoke test should end with === All checks passed ===, as in Part 4. Compare the cat output with what you wrote down in step 2.
/foss/designs is your workspace folder on your laptop, mounted into the container, so the first file is on your own disk and survives. /tmp exists only inside the container, and docker rm -f deleted the container with everything in it.
Keep your course work under /foss/designs. Even if you skip step 3, start_vnc removes any old asic-edu-osic container before it starts a new one, so every launch gives you a fresh container and anything you saved outside /foss/designs is lost. You can leave restart-test.txt where it is, since ic101_setup is IC101’s scratch folder.
Finishing
You’re done when, after the restart in Part 5, the smoke test ends with === All checks passed === in a desktop terminal and restart-test.txt is still in ic101_setup.
Submit
Nothing to submit. Keep the workspace clone, though, because every later course that uses the tools runs in it.
Next on the Course path: read Where each tool sits in the tapeout flow. If another course sent you here, go back to the page that sent you. Courses that use the tools add their own files to your workspace with mod add <course>, which What the smoke test checks describes.