Lab 01: Your repository from the template
You’ll make a Tiny Tapeout project of your own: a public repository on your GitHub account, created from Tiny Tapeout’s Verilog template. You’ll fill in the two files the template leaves for you, push, read what each workflow says, turn on GitHub Pages when the last job, viewer, asks for it, and keep going until every job is green on a commit you made. You’ll also install the test job’s tools in the workbench; the later labs use them too.
Package: labs/lab-01-your-repo-from-the-template/
Before you start
- Read Getting started, Git in one page and Templates, forks and clones.
- You need a GitHub account of your own. Any account works; the course doesn’t use the team’s GitHub organization.
- You need the workbench from IC101. Every command in this course runs in a terminal on its desktop, git included; Getting started explains why.
This lab takes about an hour, of which about 15 minutes is waiting for GitHub’s runners.
Part 1: Load the course
If you haven’t set up the workbench yet, do IC101 Lab 03 first.
From your
workspaceclone, start the desktop (./scripts/start_vnc.sh, orscripts\start_vnc.baton Windows), open http://localhost/, and open a terminal on the desktop.Load the environment and get the course files:
. /foss/designs/common/.designinit   # in every new terminal
mod add ic102-d                      # first time only: clones github.com/uoftasic/ic102-d
mod ic102-d                          # every time, including the first
You should see the
ASIC-EDU: PDK=sky130A ...banner, then this frommod add:Cloning https://github.com/uoftasic/ic102-d.git into /foss/designs/modules/ic102-d Cloning into '/foss/designs/modules/ic102-d'... OK module ready: /foss/designs/modules/ic102-d run: mod ic102-d cwd: /foss/designs/modules/ic102-dmod addleaves you in the course folder, andmod ic102-dprints the samecwd:line again, at the end.Install the test job’s tools. GitHub’s runner tests your design with Icarus Verilog 12.0 and cocotb 2.1.0, and the workbench has 14.0 and 2.0.1, so the course installs the runner’s versions next to the workbench’s, in the course folder:
cd labs/common/tt-tools
make install
make check-tools
make installtook 4.7 s on a fast connection. It puts 178 MB on your own disk, in the course folder, so the tools are still there after the container restarts. You should see this table:Tool (job) Runner Here Workbench Status ---------- ------ ---- --------- ------ Python (test) 3.11.18 3.11.16 3.12.3 ok (3.11) cocotb (test) 2.1.0 2.1.0 2.0.1 ok pytest (test) 8.4.2 8.4.2 9.1.1 ok Icarus (test) 12.0 12.0 14.0 ok Icarus (gl_test) 13.0 13.0 14.0 ok sky130A (gl_test) 8afc8346a57f - 026824c7969c not installed (optional) LibreLane (gds) 3.0.14 - 3.1.0.dev3 not installed: the gds job runs on GitHub All pinned tools are installed at the runner's versions.Run the template’s own test the way the runner’s test job does:
make selftestYou should see, after about 3 s,
** test.test_project PASS 100000.00and** TESTS=1 PASS=1 FAIL=0 SKIP=0. Your tools and the runner’s tools explains the versions, and the package README has the details.
| If you see | Do this |
|---|---|
make install stops partway with a download error |
Run make install again; it skips the parts that finished. |
fatal: detected dubious ownership in repository |
The clone was made on your laptop, and the container’s user doesn’t own it. Clone again from the workbench terminal. |
| Anything else | IC101’s Troubleshooting |
Part 2: Your identity and your token
What will your commits say about you, and how will git prove to GitHub that it’s you pushing?
Find your GitHub no-reply address. On GitHub, open Settings › Emails, turn on Keep my email addresses private, and copy the address in the sentence under it, which looks like
ID+USERNAME@users.noreply.github.com.
GitHub’s email settings, where “Keep my email addresses private” shows your no-reply address. Every commit records an email address, and in a public repository anyone can read it. Four of the team’s repositories already show personal addresses in their history. Committing with the no-reply address keeps your personal address out of your own repositories’ history. You’ll set it in each repository you clone, starting in Part 3.
Make a token for git to push with. GitHub doesn’t accept your password from git, so on GitHub open Settings › Developer settings › Personal access tokens › Fine-grained tokens, choose Generate new token, and give it:
- the name
IC102 workbench, and your own account as the Resource owner, which the form has already chosen. - an Expiration of 60 days. The menu starts at 30 days, so choose “60 days” in it.
- All repositories under Repository access, because the repositories for Labs 04 and 05 don’t exist yet. The form starts on “Public repositories”, so you have to change it.
- two repository permissions, Contents and Workflows, both “Read and write”. Contents is the permission every push needs. You need Workflows as well, because it’s the permission that lets a token add or change files under
.github/workflows/, and two of your pushes, in Labs 04 and 05, do that. GitHub’s documentation gives the same two permissions, for the same reasons, to a GitHub App that uses git (choosing permissions for Git access). To add them, press Add permissions under Permissions and tick both in the list it opens. Three rows appear, because GitHub adds Metadata (“Required”, “Read-only”) by itself. Workflows comes in as “Read and write”, the only choice its menu has, but Contents comes in as “Read-only”, so change it to “Read and write”.
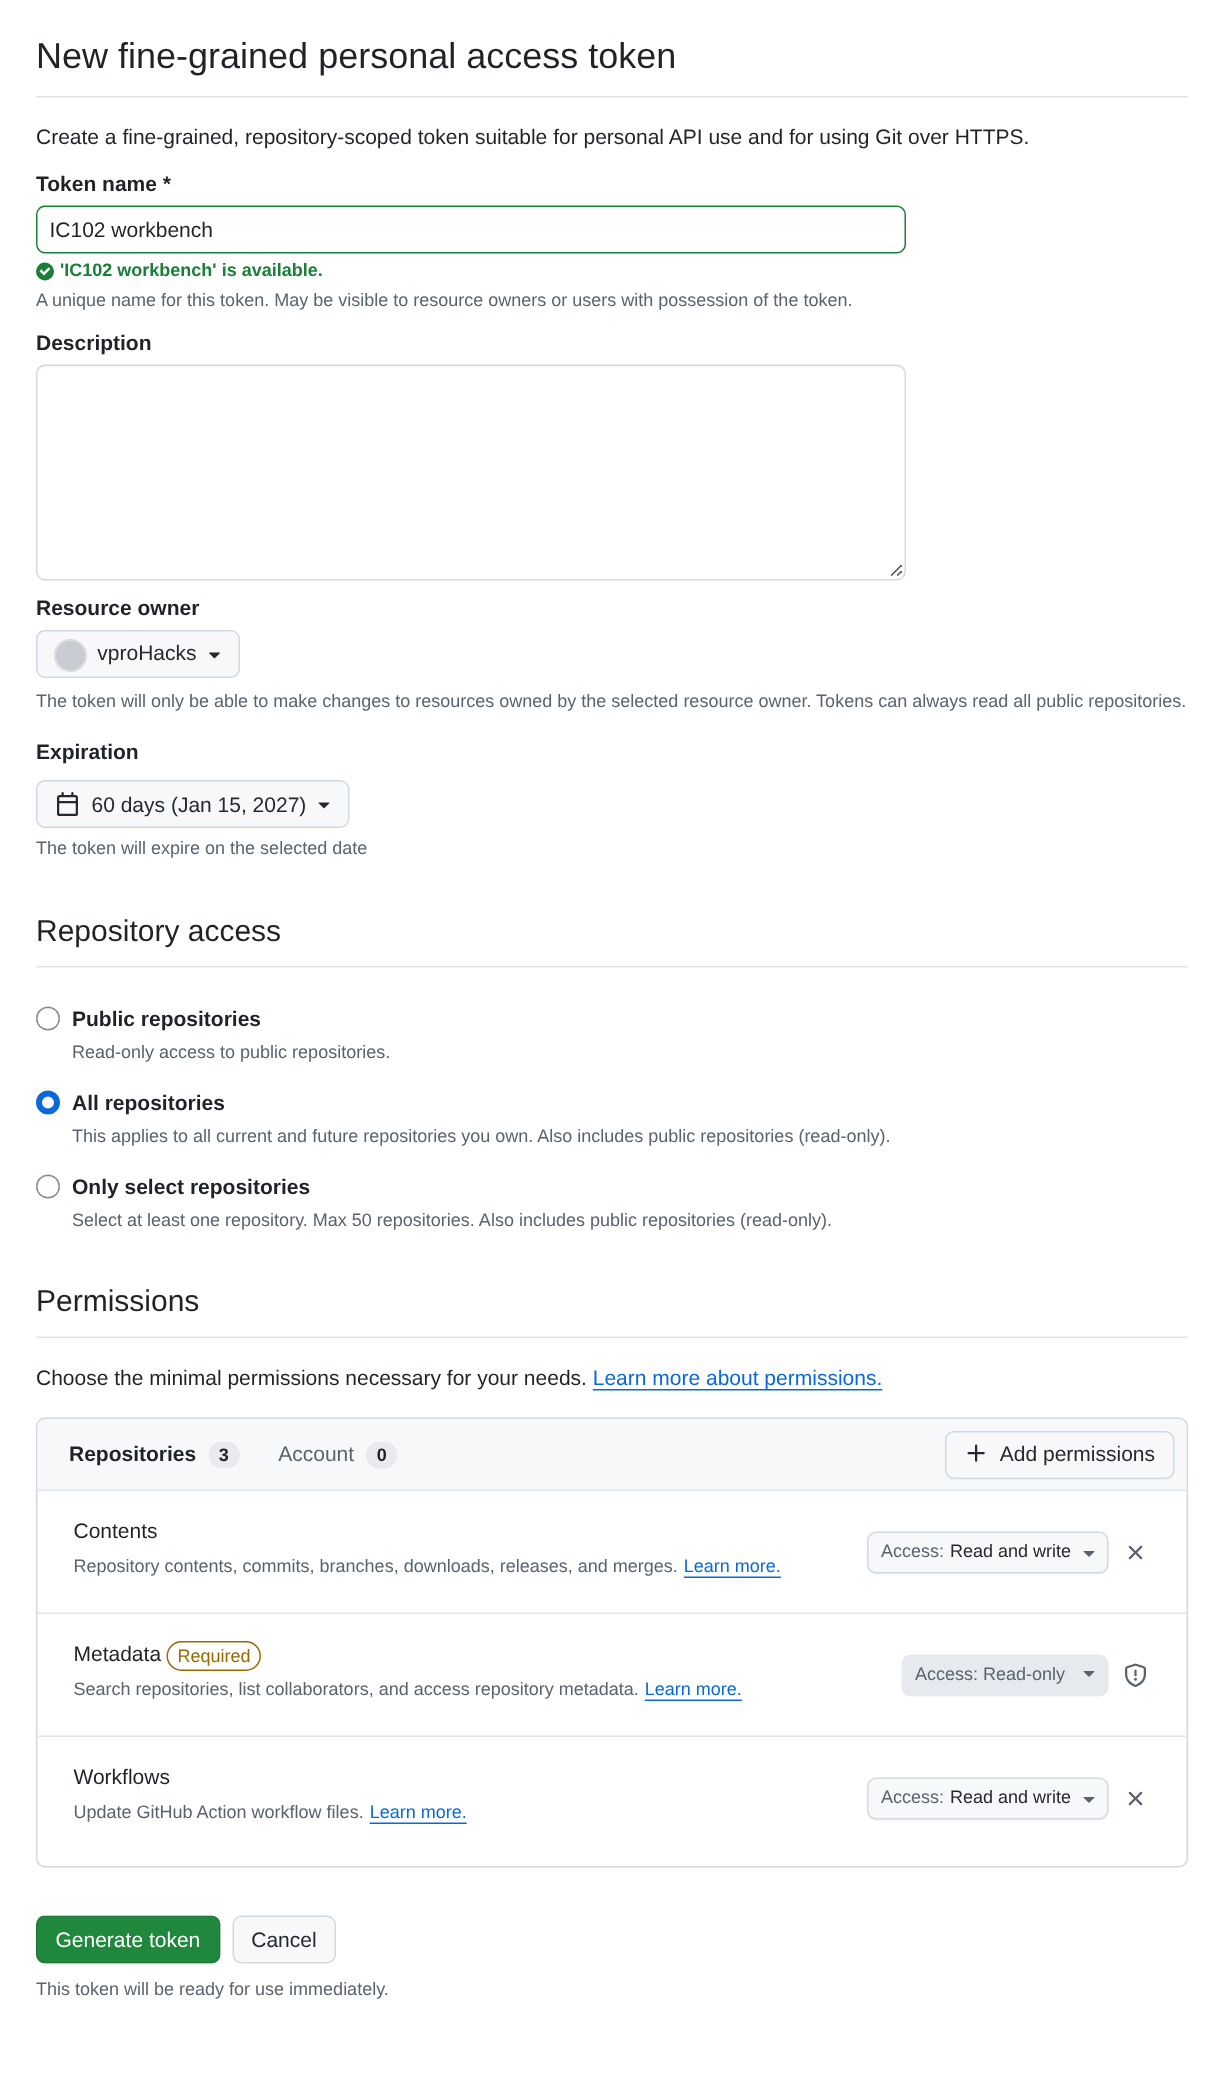
The token form filled in as this step says, in the course’s practice run on Nov 16, 2026, when the 60-day expiry fell on Jan 15, 2027. The resource owner is the account the practice run used; yours shows your own username. Press Generate token at the bottom of the form, and copy the token when GitHub shows it, because GitHub shows it only once. Keep it in your password manager. A file in your workspace is a bad place for it, because the workspace is a git clone and a file there can end up in a commit. Getting started says why the course uses this kind of token and not a classic one.
- the name
You should see: a no-reply address and a token, both copied somewhere safe.
Part 3: Make the repository
What does the template give you, and what will its workflows say about it before you’ve changed anything?
Open https://github.com/TinyTapeout/ttsky-verilog-template, press Use this template › Create a new repository, and set the owner to your own account. Name it
ttsky-ic102-d, choose Public, and leave Include all branches off. (The labs use that name in their commands; another name works if you change it there too.) It must be public: GitHub’s runners are free on public repositories, and Pages, which the last job needs, is available on a free account only for public ones.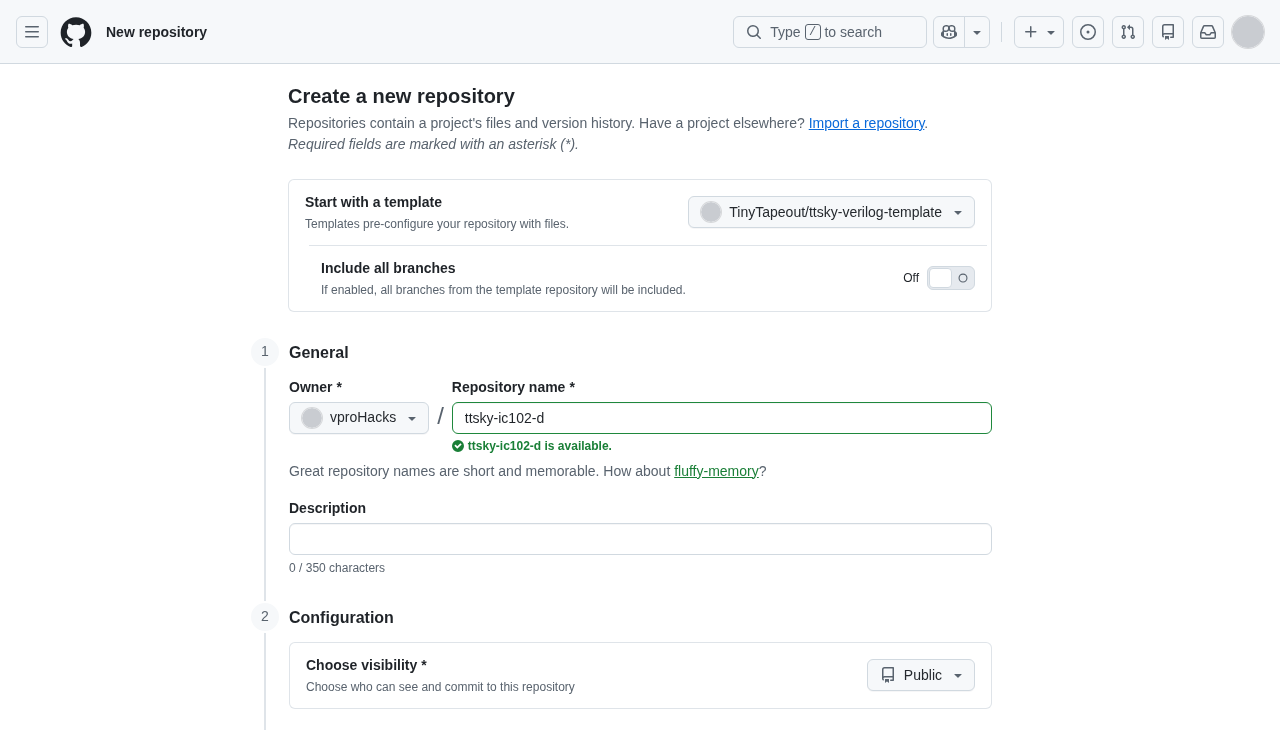
Creating a repository from the template. GitHub makes the repository and commits the template’s files to it, and that commit counts as a push, so three workflows have already started:
docs,testandgds. (The fourth,fpga, is switched off.) Before you look, predict which of the three pass on this first commit.Clone the repository into the
projectsfolder of your workspace, and set your identity and token cache for it:mkdir -p /foss/designs/projects && cd /foss/designs/projects git clone https://github.com/YOUR-USERNAME/ttsky-ic102-d.git cd ttsky-ic102-d git config user.name "Your Name" git config user.email "ID+USERNAME@users.noreply.github.com" git config credential.helper 'cache --timeout=28800'Put your username, your name and the no-reply address from Part 2 in place of the placeholders. These three settings go in this clone’s
.git/config, which is on your own disk. Settings made with--globalwould be lost the next time the container starts, so you’ll make the same three settings in every clone in this course.Look at what came with the template:
git log --oneline
ls .github/workflows
grep -n "uses: TinyTapeout" .github/workflows/*.yaml
You should see one commit,
Initial commit, the four workflow filesdocs.yaml fpga.yaml gds.yaml test.yaml, and six lines ending in the same tag:.github/workflows/docs.yaml:17: uses: TinyTapeout/tt-gds-action/docs@ttsky26d .github/workflows/fpga.yaml:19: uses: TinyTapeout/tt-gds-action/fpga/ice40up5k@ttsky26d .github/workflows/gds.yaml:17: uses: TinyTapeout/tt-gds-action@ttsky26d .github/workflows/gds.yaml:26: uses: TinyTapeout/tt-gds-action/precheck@ttsky26d .github/workflows/gds.yaml:38: uses: TinyTapeout/tt-gds-action/gl_test@ttsky26d .github/workflows/gds.yaml:47: - uses: TinyTapeout/tt-gds-action/viewer@ttsky26dttsky26dnames the version of Tiny Tapeout’s actions that your repository uses. Your workflow files keep namingttsky26dwhatever Tiny Tapeout later changes in its template, although Tiny Tapeout can move the tag itself to a new commit, as The Tiny Tapeout workflows explains.Now open your repository’s Actions tab and compare it with your prediction.
TipAnswertestpasses, anddocsandgdsfail.testruns the template’s own test on the template’s adder, and the adder is correct.docsandgdsboth readinfo.yaml, whose title, author and description are empty. Ingdsonly the first job runs, and the other three are skipped because each one hasneeds: gds.hart-1’s first commit, made from the same template on Oct 18, got the same results. Here are its check runs, read with the course’scheck-runs.py:uoftasic/hart-1 at 29313b4 docs failure test success gds failure precheck skipped gl_test skipped viewer skippedThe course’s practice repository, made from the template on Nov 16, 2026, got the same six results on its first commit, with
docsred after 25 s andgdsred after 48 s.
You should see: one commit in your clone, and one green and two red workflows on GitHub.
Part 4: Fill it in
Which of the six jobs pass once info.yaml and docs/info.md are filled in?
Edit
info.yaml, reading each comment as you go. Fill intitle,author(whatever name you want public; it ends up in the datasheet),description, and the pinout. The design is still the template’s adder, which addsui_inanduio_inand puts the sum onuo_out, so name the pins for that, for exampleui[0]: "a[0]",uio[0]: "b[0]"anduo[0]: "sum[0]". Leavetop_module,tilesandclock_hzas they are. Don’t add or delete any pins.Edit
docs/info.md. Replace the sentence under “How it works” and the one under “How to test” with a few real sentences each, because the docs check fails for as long as the template’s sentences are still there.Commit and push. The first push asks for your GitHub username, and then for a password: paste the token there. The cache remembers it for 8 hours.
git add info.yaml docs/info.md
git commit -m "Fill in info.yaml and docs/info.md"
git push
Predict the result of each job before you look:
docs,test, and the four jobs ofgds. Thegdsjob builds the layout this time, which took 2 min 50 s in the course’s practice repository, and the three jobs after it, which run side by side, took another 2 min 26 s.TipAnswerFive pass and
viewerfails.viewerpublishes your layout with GitHub Pages, and Pages is off in a repository made from a template. The same failure keptprotocol-emulator’sgdsruns red: in the two of its runs we checked, the layout built and precheck passed, and onlyviewerfailed. The practice repository got the same: five green, andviewerred after 16 s.Open the
viewerjob’s log (you have to be signed in to GitHub to see it) and find the line that says what to do. In the practice repository’s run 43826443768 it was:##[error]Error: Failed to create deployment (status: 404) with build version 1e5f04aba0db818605ad318fb00c018d94be6d98. Request ID 9BB4:34D4D8:189992:27A7DC:6AFAB621 Ensure GitHub Pages has been enabled: https://github.com/vproHacks/ic102-test-d/settings/pagesThe line in your log has your own commit as the build version, and your own repository’s settings page at the end.
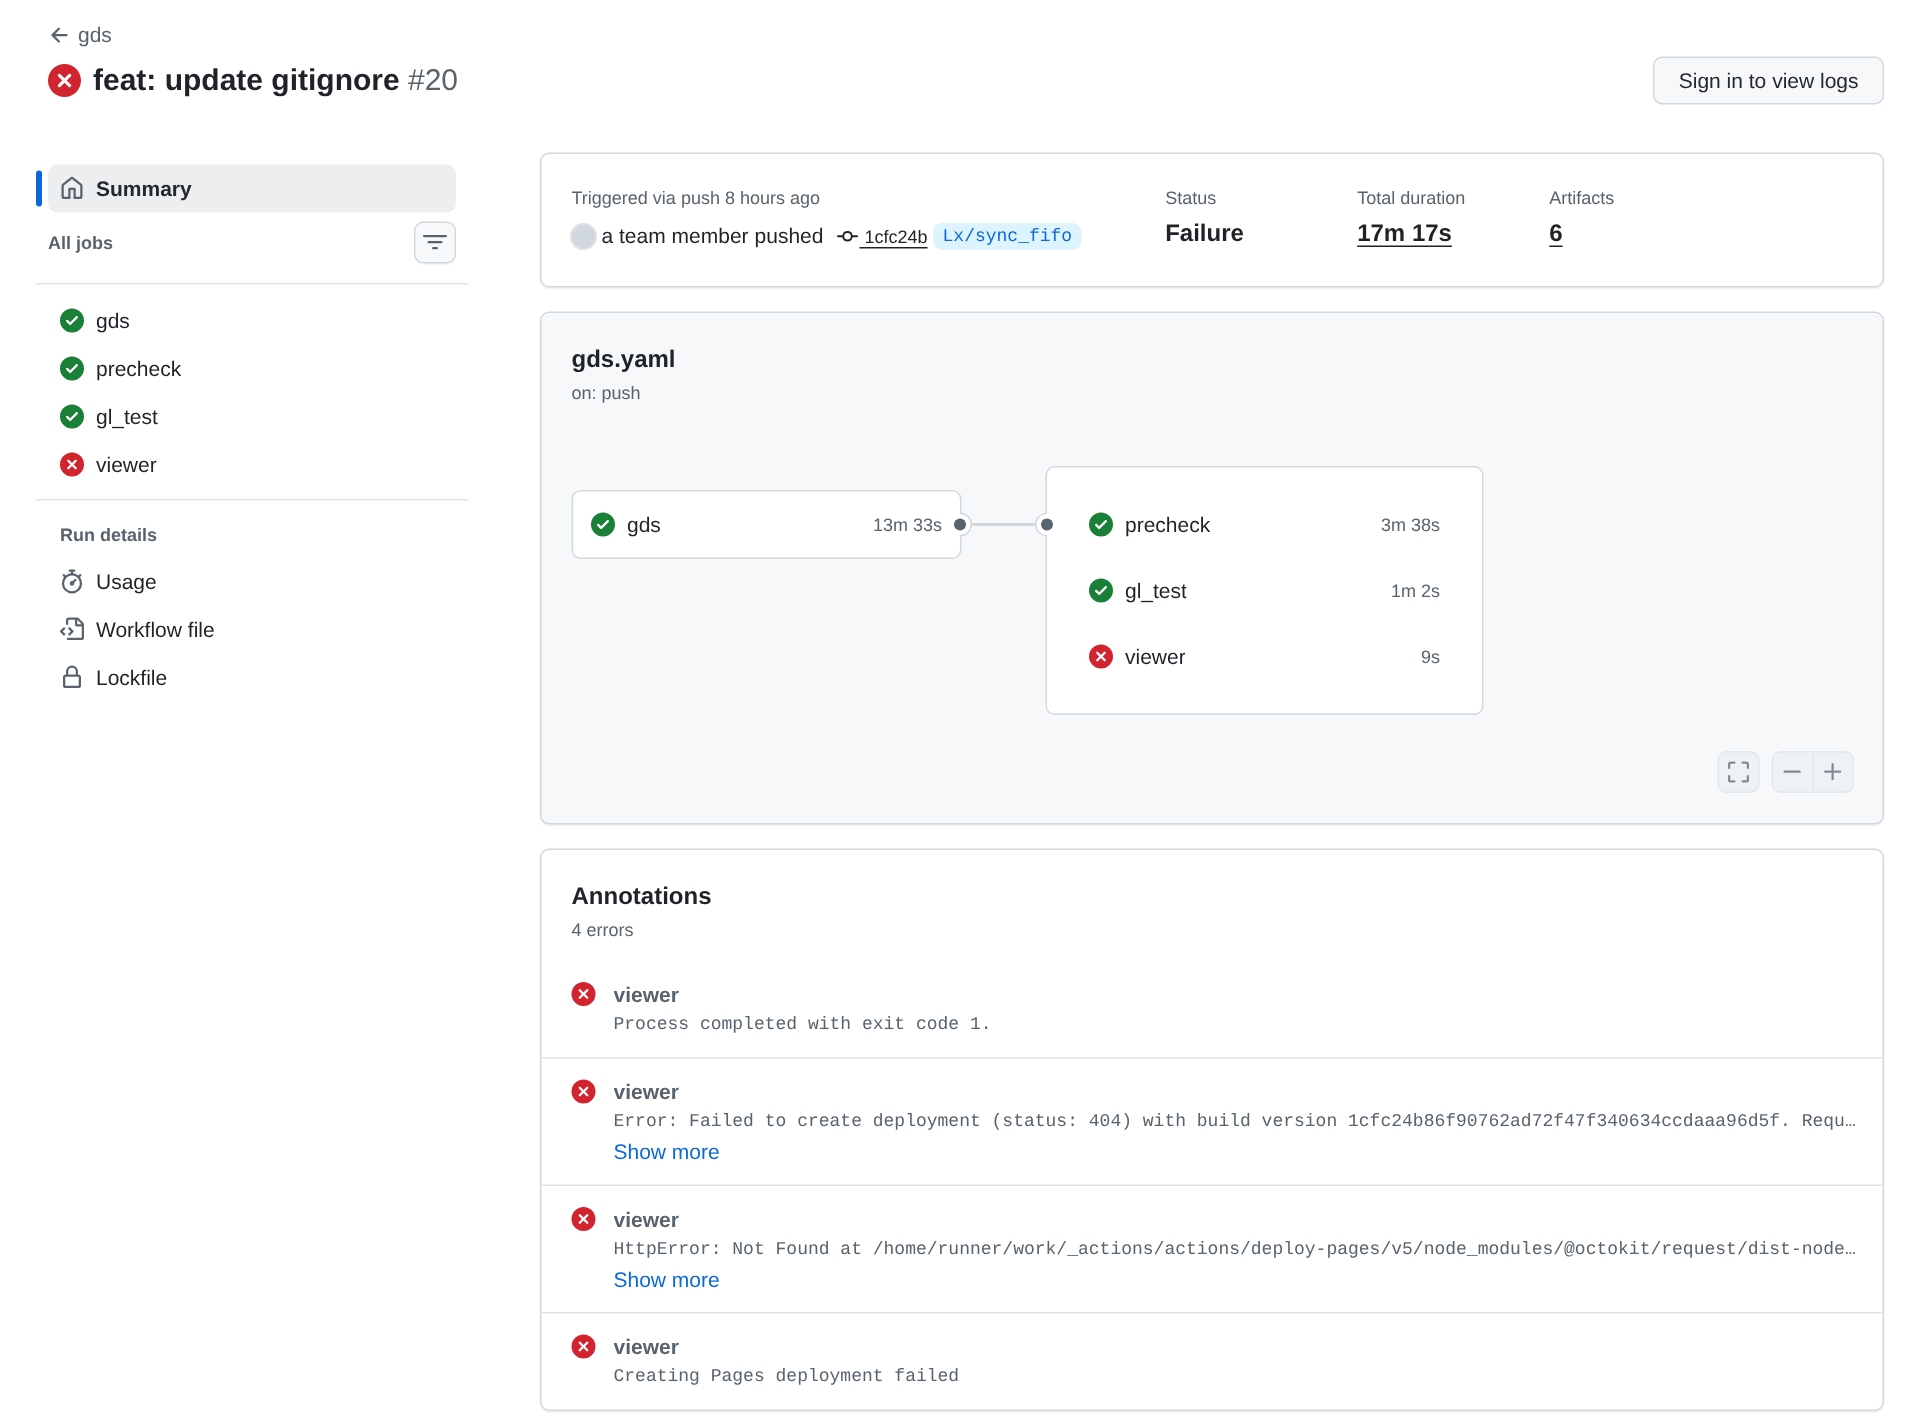
A protocol-emulator gds run where only the viewer job failed.
You should see: docs and test green, and in gds everything green except viewer, with the 404.
Part 5: Turn on Pages
How do you fix a failure that isn’t in any file?
On GitHub, open your repository’s Settings › Pages, and under Build and deployment › Source, choose GitHub Actions.
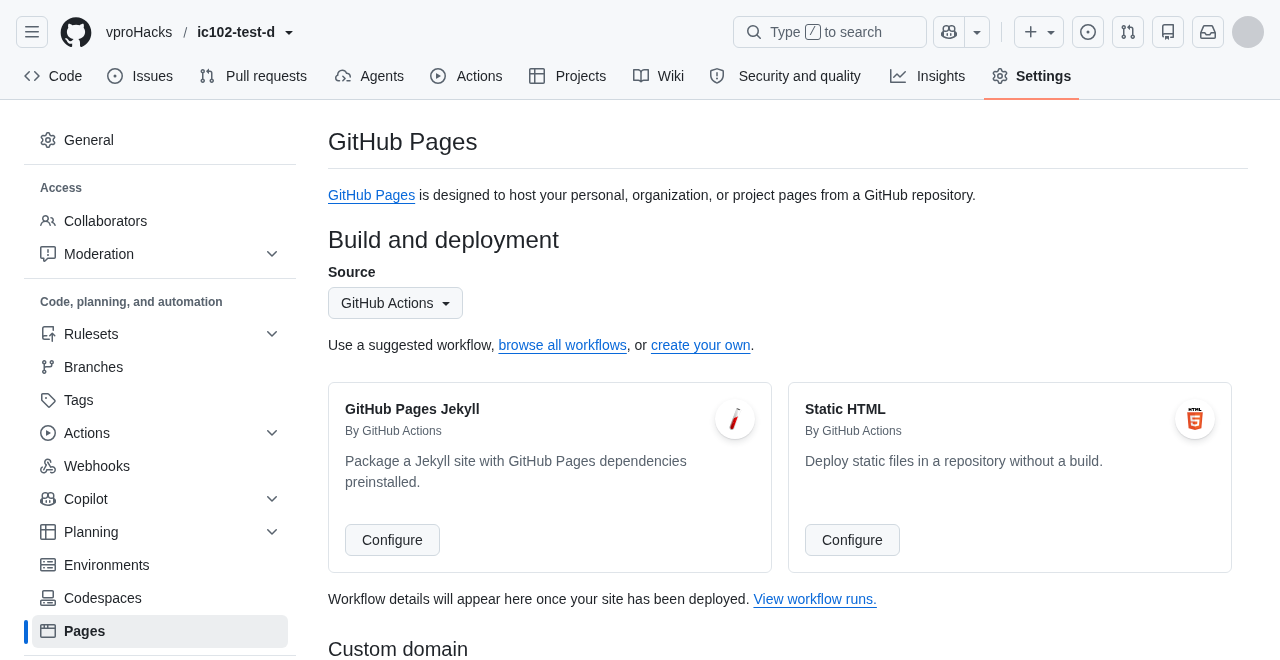
Settings › Pages, with the source set to GitHub Actions. Start a new run of the
gdsworkflow: on the Actions tab, choose gds in the list of workflows, then Run workflow on the right, and run it onmain. (Pushing a new commit would start a new run too.)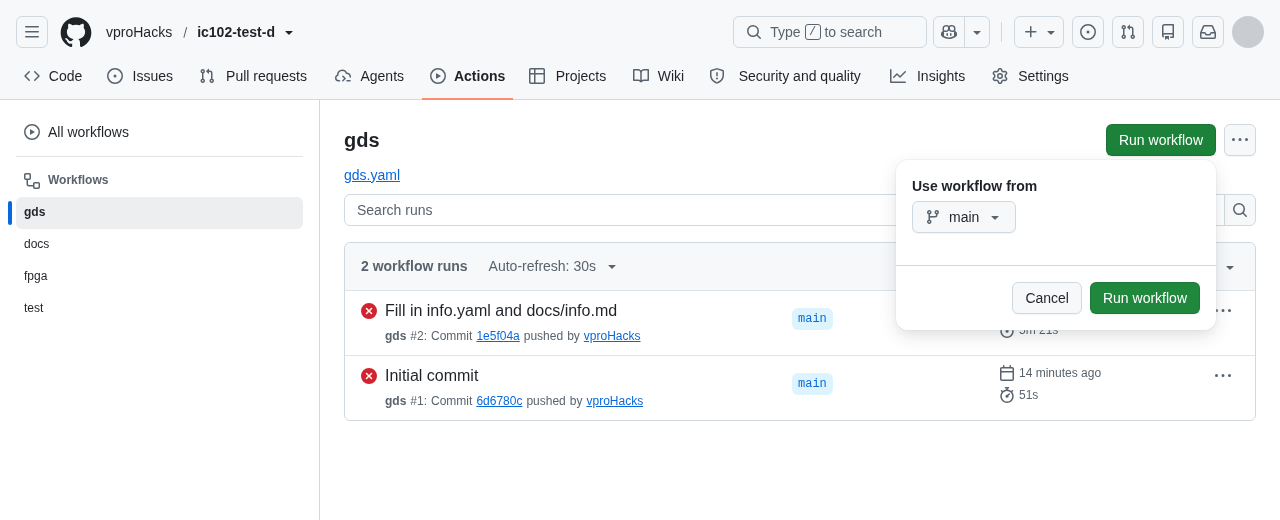
Starting a new run of the gds workflow by hand: the menu under Run workflow, with the branch set to main. The run starts only when you press the green Run workflow button inside the menu. Start a new run rather than pressing Re-run failed jobs on the old one. A re-run keeps the first attempt’s Pages artifact, and the
vieweraction at thettsky26dtag uploads an artifact with the same name on every attempt, so the re-run fails withMultiple artifacts named "github-pages". A new run starts with no artifacts, so it doesn’t have this problem.sentry’s re-runs failed this way, and Reading a workflow file has the log.When the run finishes, every job should be green. The practice repository’s new run took 4 min 5 s, and looked like this run of
sentry’s: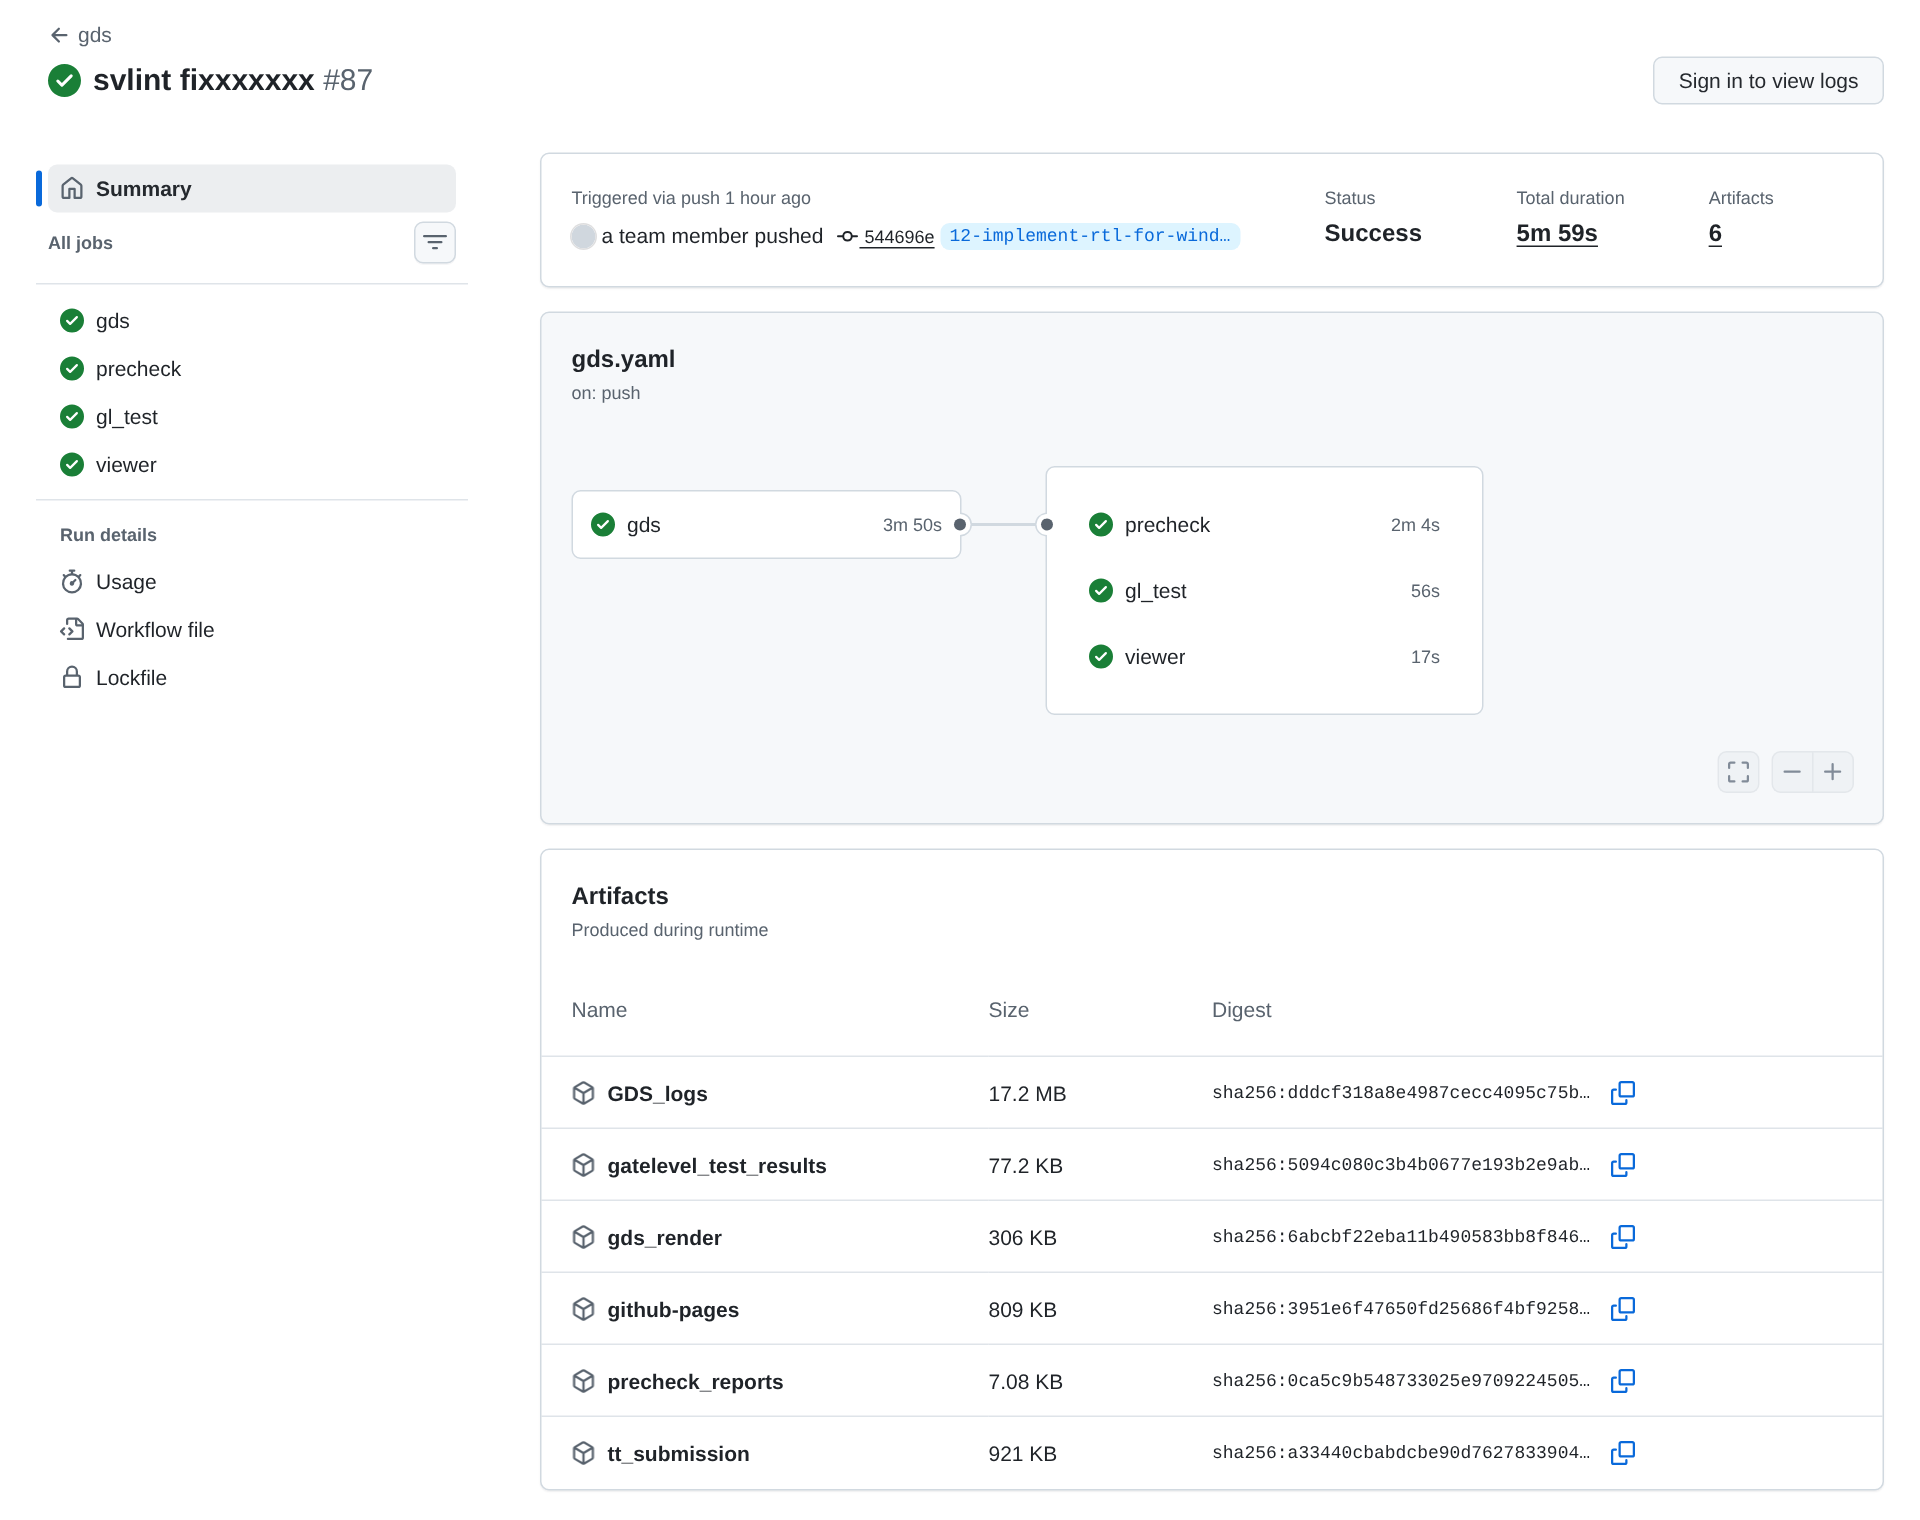
A fully green sentry gds run and its six artifacts. Open your project’s page; Settings › Pages now shows its address. Tiny Tapeout’s 3D viewer reads your layout from that page.
Check your work:
python3 /foss/designs/modules/ic102-d/labs/lab-01-your-repo-from-the-template/check.pyIt checks your files and your history, then reads your commit’s jobs from GitHub’s public API. On the course’s practice repository,
ic102-test-d, cloned into the folder these steps use, it printed:Checking /foss/designs/projects/ttsky-ic102-d GitHub: vproHacks/ic102-test-d at 1e5f04a docs success test success gds success precheck success gl_test success viewer success VERDICT: PASSgdsand the three jobs after it show the new run’s results, because when a job has run more than once on the same commit, the check reads the latest.
You should see: six green jobs on your commit, and VERDICT: PASS.
Finishing
You’re done when check.py prints VERDICT: PASS, which it does when info.yaml and docs/info.md are filled in, HEAD is a commit of yours on top of the template’s, and all six jobs passed on it.
Questions:
The template’s own first commit passed
test. What did that pass tell you about the design?TipAnswerIt told you very little. The test drives one pair of inputs, 20 and 30, and checks for 50, so all it shows is that the adder gets that one sum right. A design that handled only that one case would pass it too. You’ll write a stronger test in Lab 03.
Your fix in Part 5 didn’t change any file. How would someone reading your history later know why the
viewerjob started passing?TipAnswerThey wouldn’t, from the history alone: turning on Pages changed a setting and made no commit, and the run logs that show the 404 are deleted after 90 days. That’s a reason to write the change down somewhere it lasts, for example in the README, or in an issue.
Submit: the link to your repository.
Next on the Course path: read What a cloud runner is, Reading a workflow file and The Tiny Tapeout workflows, then do Lab 02: Read the red X.