Getting started
Nearly everything you do in AD103 happens in XSchem, a schematic editor. You draw a circuit, XSchem turns the drawing into a SPICE netlist, and ngspice simulates the netlist and hands you back numbers:
\[\text{schematic} \;\longrightarrow\; \text{netlist} \;\longrightarrow\; \text{ngspice} \;\longrightarrow\; \text{a number}\]
You have probably never used XSchem, so this page explains how those pieces fit together, and goes through the handful of mistakes that cost new users the most time. You won’t install anything here. AD103 needs one Docker image and a browser, and you already have both from IC101. You’ll start the tools and draw your first schematic in Lab 01.
The PDK setting
The workbench image can simulate more than one manufacturing process. The environment variable PDK chooses which one, and the image’s default is ihp-sg13g2, a real 130 nm process from IHP in Germany. We use SKY130 for everything in AD103, so you’ll need to change it.
This matters more in AD103 than anywhere else in the curriculum, because XSchem reads $PDK when it starts up to decide which device library to load, and it doesn’t tell you which one it picked. If you launch it with the default setting, you get an editor that looks perfectly healthy:
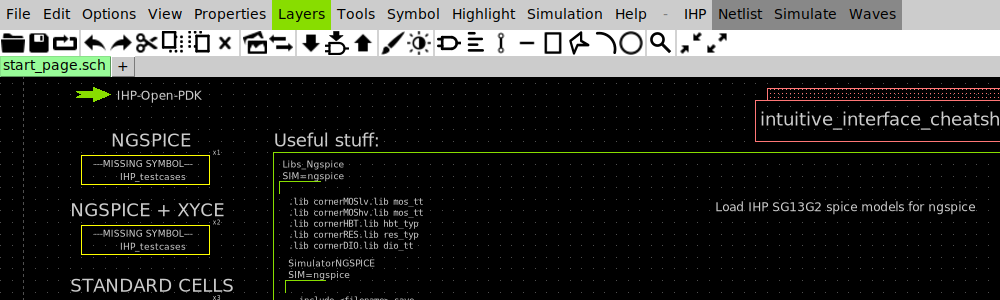
The menu bar says IHP, the tab says start_page.sch, and the page offers to load “IHP SG13G2 spice models”. XSchem gives no error and no warning.
None of the sky130_fd_pr/... symbols this course uses will be there. If you draw a circuit anyway, the netlist will have IS MISSING !!!! next to your transistor, and XSchem will still report that it finished successfully.
The fix is a setup script from the workspace repo, /foss/designs/common/.designinit, which sets PDK=sky130A. You load it with a leading ., which is the shell’s source command. That runs the file in your current shell rather than in a new one, and it’s the only way a script can change your shell’s environment. The catch is that the change lasts only as long as that shell, so you have to load the script again in every new terminal you open.
Checking takes a couple of seconds: echo $PDK should print sky130A, and XSchem’s menu bar should say SKY130. You’ll make the first check in Lab 01, Part 1, and the second in Part 3, and it’s worth making a habit of both.
Where XSchem starts
When XSchem starts, it reads a settings file called xschemrc from the directory you launched it in. Each AD103 lab has one in its xschem/ folder. That file is what makes the SKY130 symbols resolve, and it also puts your netlists somewhere you can find them. Three habits follow from this:
- Launch XSchem from a terminal, not from a desktop icon. Some of XSchem’s messages are printed to the terminal it was started from. If you start it from a menu there is no such terminal, so those messages are lost, and the program can appear to do nothing at all.
- Launch it from the directory your schematics are in, so that it reads that directory’s
xschemrc. If symbols that worked yesterday have vanished today, you probably started XSchem from somewhere else. - Name the file you want to open, as in
xschem nmos_probe.sch &. If you don’t give a filename, XSchem opens whatever its settings name as the start page, which is the subject of the next section.
The PDK start page
Every AD103 lab sets the start page to a blank untitled.sch in the lab directory, so inside a lab folder a bare xschem & does no harm. Anywhere else (a scratch folder of your own with no xschemrc, say) you get the SKY130 PDK’s own start page instead:
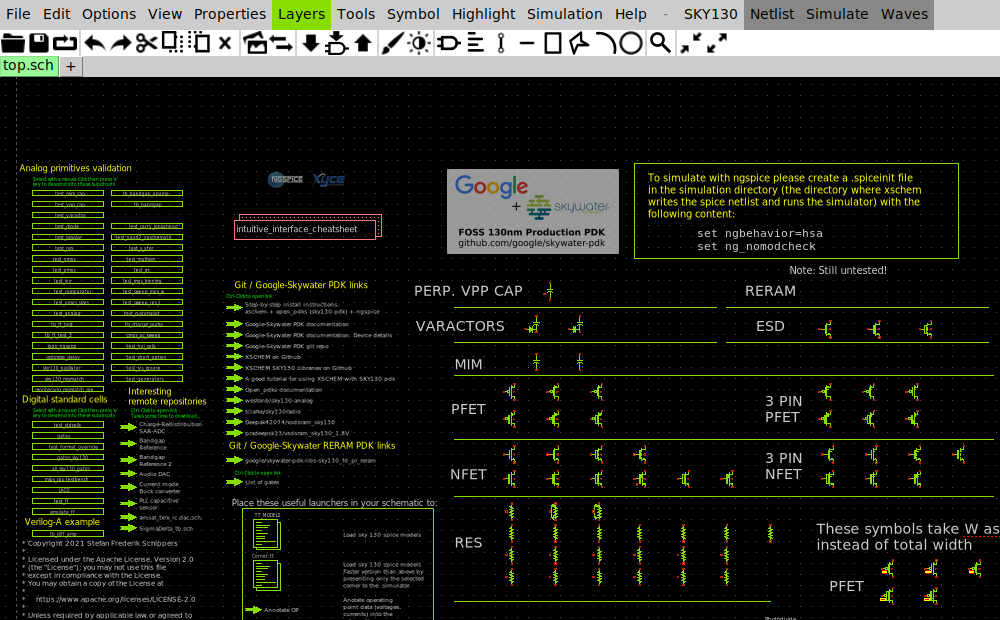
The menu bar reads SKY130, and the canvas is a live schematic: the NFET, PFET, RES, MIM and VARACTOR rows are real symbols. It looks like any other page you could work on, but you can’t save anything to it.
That page is a real file, /foss/pdks/sky130A/libs.tech/xschem/sky130_tests/top.sch, and it sits inside the PDK, which is read-only. Two things go wrong if you work on it, and XSchem explains neither of them:
Ctrl-Scan’t write the file. XSchem askssave file?, you answer Yes, and it replies with a box sayingfile opening for write failed!. The tab keeps its*, the file on disk doesn’t change, and nothing is printed in the terminal.- Netlist writes the netlist into the same directory as the schematic, so it tries to create a
simulation/folder inside the PDK and stops with this box:
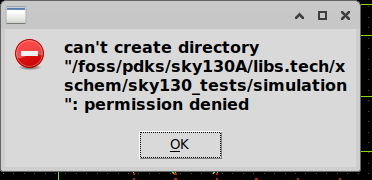
can't create directory
"/foss/pdks/sky130A/libs.tech/xschem/sky130_tests/simulation": permission denied
Nothing is wrong with your installation, the PDK or your drawing; you’re simply working in a read-only folder. Open a schematic that lives in your own directory and the error goes away. If you’ve already drawn something on the start page, File → Save as into your own folder will keep it.
Units on W and L
On a SKY130 transistor, W and L are plain numbers in microns, with no unit suffix. W=1 means one micrometre. Adding a u is the most common SKY130 mistake there is, and nearly everyone makes it at least once.
It’s an easy mistake to make, because everywhere else in SPICE you would write 1u for a micron, so W=1u looks right. The SKY130 models already treat the number as microns, though, so W=1u asks for a millionth of a micron. XSchem accepts this without a murmur. Here is the device line it writes when both W and L have the suffix:
XM1 d g 0 0 sky130_fd_pr__nfet_01v8 L=0.15u W=1u nf=1 ad=2.9e-07 as=2.9e-07 pd=0.580002 ps=0.580002 nrd=290000 nrs=290000 sa=0 sb=0
+ sd=0 mult=1
The symbol calculates the diffusion areas and resistances from W, so the mistake spreads to other parameters: nrd went from 0.29 to 290000, and ad from 0.29 to 2.9e-07. Those two us changed six other numbers, and XSchem didn’t mention any of it.
It’s ngspice that finally objects:
could not find a valid modelname
    Simulation interrupted due to error!

Error: incomplete or empty netlist
       or no ".plot", ".print", or ".fourier" lines in batch mode;
no simulations run!
could not find a valid modelname almost always means a unit suffix on W or L. The SKY130 models are binned: each .model card covers a range of widths and lengths, and a device has to fall inside one of those ranges to get a model. A width of a millionth of a micron is outside every bin, so no model matches and ngspice stops. The message mentions neither W nor units, so when you see it, check W and L first instead of trying to work out what the message means. Reading a SKY130 device model explains binning in full.
In Lab 01, Part 6 we have you cause this error on purpose, so that you’ll recognise it when it happens by accident.
How wires connect
In XSchem, a wire connects to something only where one of its endpoints lands on a pin or on another wire. Two wires that cross each other are not connected. XSchem draws a small solid dot at a real junction, and nothing at all where two wires just pass over each other:
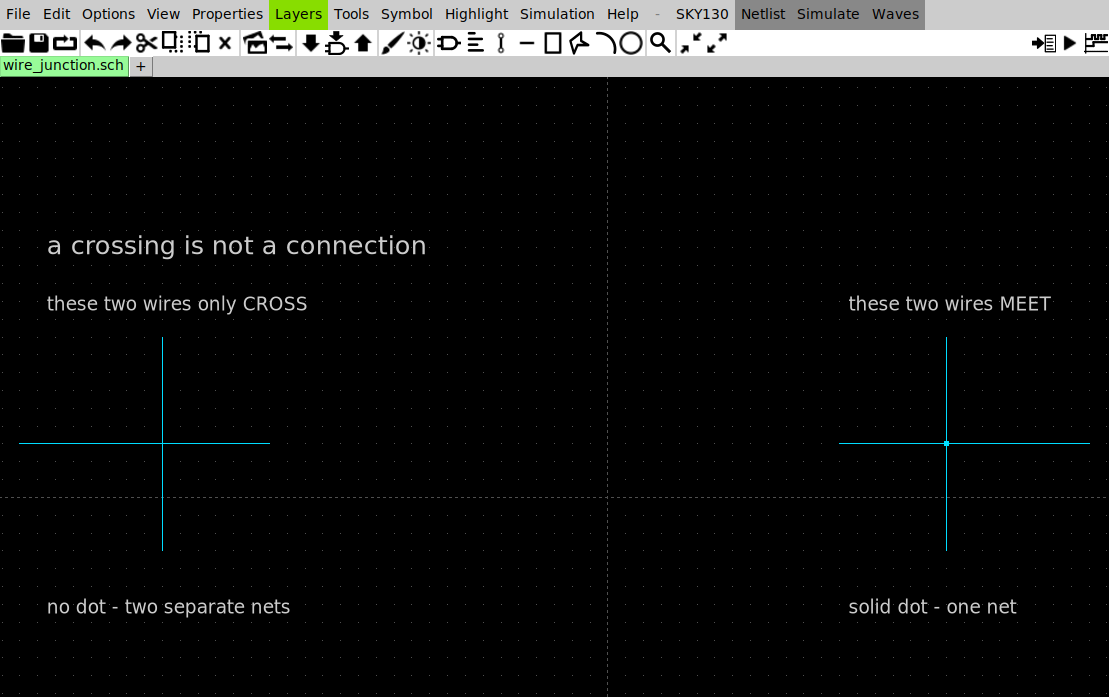
The same pair of wires drawn twice. On the left, one wire runs over the other and XSchem draws nothing at the crossing: these are two separate nets that happen to overlap on the screen. On the right, four wire ends land on the same grid point and XSchem draws a dot, so they form one net. The dot is the only visible difference, and it’s only a few pixels across, so zoom in on every junction before you netlist.
XSchem also snaps every click to a grid, so a wire can end one grid step short of a pin, and at normal zoom it will still look connected. Lab 01 shows you how to land wire ends on pins with Shift-W, and the netlist check later on this page finds the gaps you miss.
For long connections you don’t need to draw a wire at all. Instead you name the net: put a net label (lab_pin.sym) at each end and give both labels the same name. Any two labels with the same name are the same net, wherever they sit on the page, and every supply and ground connection in this course is made this way.
Here is the reference schematic from Lab 01, which is the first one you’ll netlist:
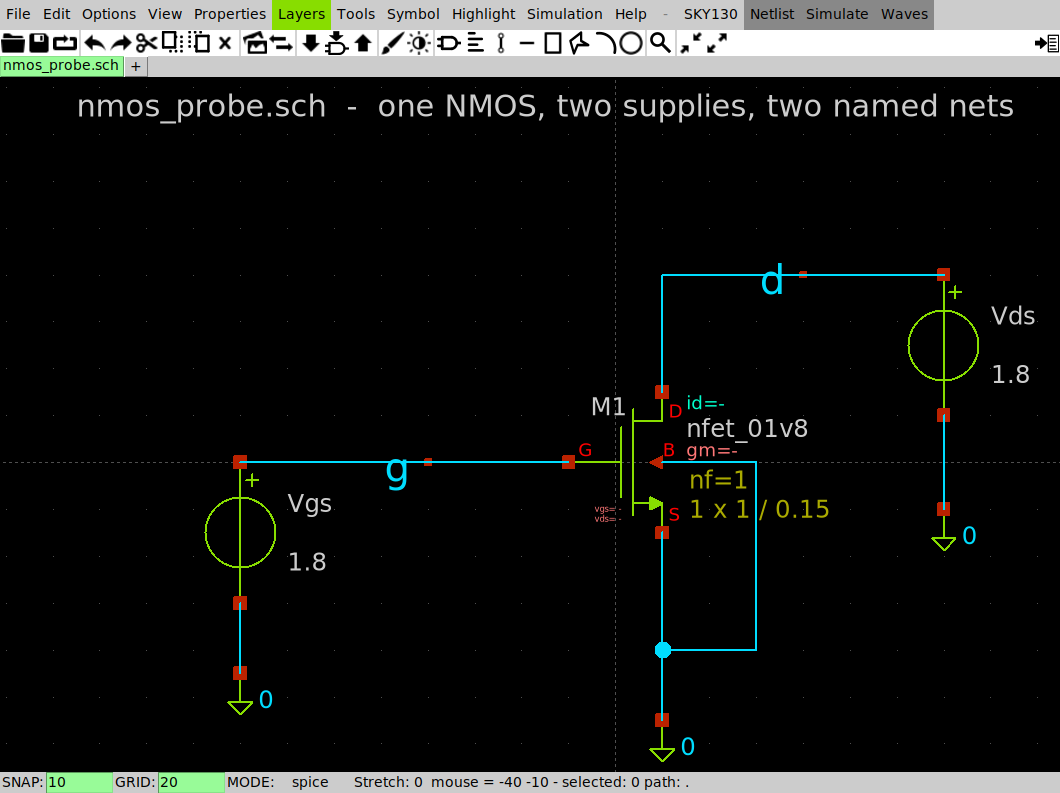
One nfet_01v8 with W=1 and L=0.15. Vgs drives the gate through a net labelled g, and Vds drives the drain through d. The source and body both go to ground, and the filled cyan dot where they meet is a real junction. The status bar reads SNAP: 10 GRID: 20 MODE: spice; the snap setting is why wires land exactly on pins instead of next to them.
XSchem labels each device with its size, here nfet_01v8, nf=1 and 1 x 1 / 0.15. The last one means mult × W / L, and it lets you check the sizes on a whole page of transistors at a glance.
The netlist
When you click Netlist, XSchem writes a SPICE file and tells you almost nothing about it, so it’s worth knowing where the file goes and what’s in it.
Where it goes. By default the netlist is written to ~/.xschem/simulations/, a folder inside the container, so it’s deleted along with the container even though your schematic is safe on your own disk. The setting Simulation → Use ‘simulation’ dir in schematic dir changes this, so that netlists go into a simulation/ folder next to the .sch file. Each lab’s xschemrc turns it on with set local_netlist_dir 1; a scratch directory of your own won’t have that line.
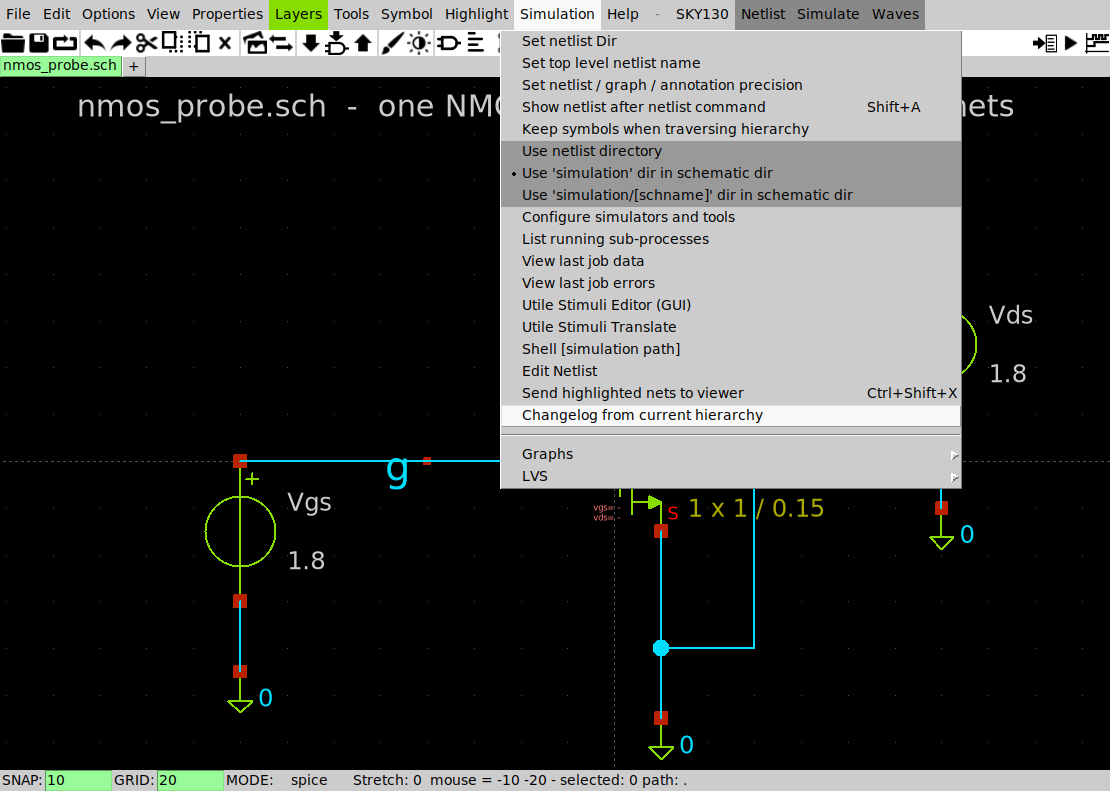
The three netlist-directory entries are radio buttons, so exactly one of them is on. Here it’s the middle one, which is what set local_netlist_dir 1 in a lab’s xschemrc selects.
What’s in it. This is the netlist of nmos_probe.sch:
** sch_path: /foss/designs/modules/ad103/labs/lab-01-first-schematic/xschem/nmos_probe.sch
**.subckt nmos_probe
XM1 d g 0 0 sky130_fd_pr__nfet_01v8 L=0.15 W=1 nf=1 ad=0.29 as=0.29 pd=2.58 ps=2.58 nrd=0.29 nrs=0.29 sa=0 sb=0 sd=0 mult=1
Vgs g 0 1.8
Vds d 0 1.8
**.ends
.end
Your whole drawing is in those seven lines. XM1 d g 0 0 is the transistor, followed by its four terminals in a fixed order: drain, gate, source, body. The names are the labels you placed, and 0 is ground, which SPICE has always called node zero.
Notice that there are no device models and no analysis command. A netlist describes only the circuit. The .lib line that loads the SKY130 models and the .control block that says what to measure belong in the testbench, and you’ll meet your first testbench in Lab 02.
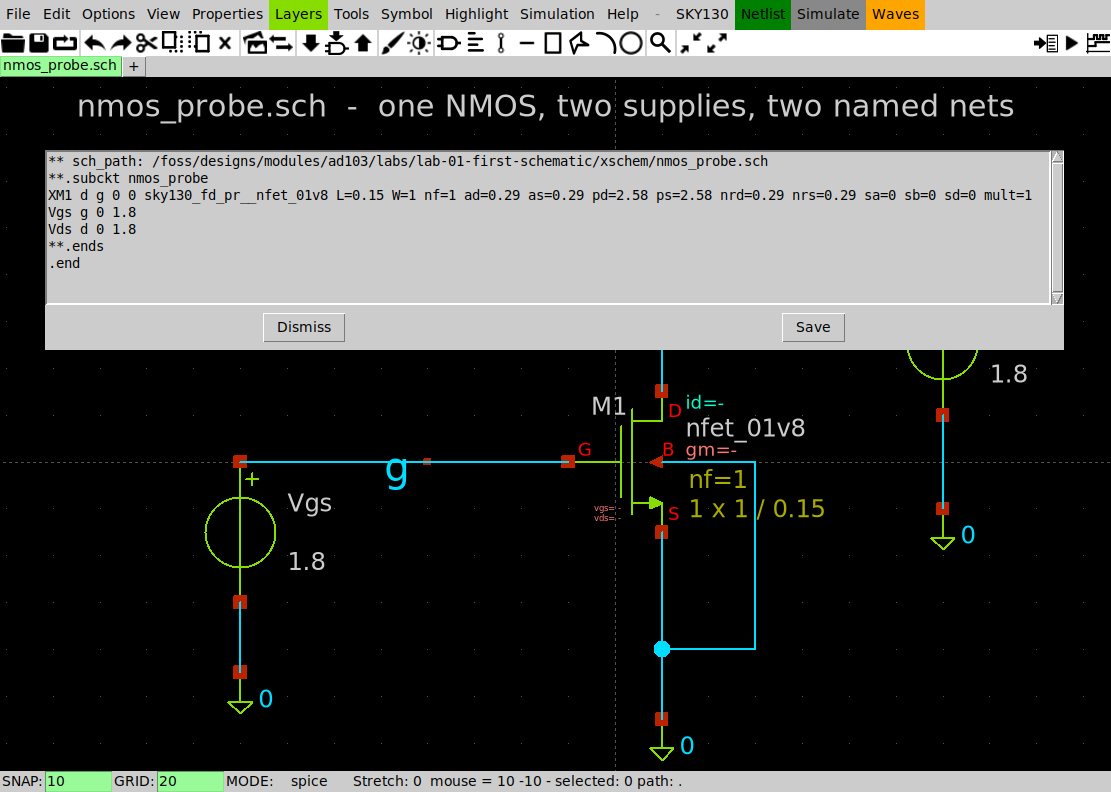
With Simulation → Show netlist after netlist command (Shift-A) ticked, each press of Netlist opens the file in its own window, with the schematic still visible behind it.
Invented net names
Read the four node names on the device line; they should be exactly the nets you labelled. If the gate wire stops one grid step short of the gate pin, XSchem writes this instead, with no error, no warning and an exit status of 0:
XM1 d net1 0 0 sky130_fd_pr__nfet_01v8 L=0.15 W=1 nf=1 ...The gate’s net g has become net1. XSchem invents a name for every pin that isn’t connected to anything, and all the invented names look like net followed by a number. So after every netlist, search for them with grep 'net[0-9]' simulation/*.spice. Any match is a wire you think is connected but isn’t. This is quicker and more reliable than inspecting the canvas by eye, and it finds nine out of ten wiring mistakes in this course. Lab 01, Part 7 shows you what ngspice makes of a circuit like this.
Simulation time
Every SPICE deck in this course loads the SKY130 models with this line:
.lib $PDK_ROOT/sky130A/libs.tech/ngspice/sky130.lib.spice ttThe tt at the end picks the typical corner. Loading the model library is slow: a single-deck run such as Lab 01’s make takes about ten seconds, and the terminal shows nothing while ngspice reads the models. It hasn’t hung, so don’t press Ctrl-C.
Getting help
The course is self-paced, but that doesn’t mean you have to work through it alone.
- Ask in the team Discord. No question is too basic. In an EDA tool, much of what looks like your own mistake is really the tool being unhelpful, and XSchem in particular tends to fail without saying anything.
- Quote the exact error, and say where you saw it. Some of XSchem’s messages go to the terminal it was launched from, and others, such as the two error boxes on this page, appear only in the XSchem window, with nothing in the terminal. Either way, paste the text, along with the command you ran and the output of
xschem --version. - Post a screenshot of the schematic. A wiring problem that’s obvious in a screenshot can be very hard to describe in words.
- If a command on these pages doesn’t do what the page says, that’s a bug in the course, and we’d like you to report it. We ran every command here before writing it down and copied every number from a real run, so a mismatch means something has changed, and we want to know.
Check yourself
Answer these on paper before you start Lab 01.
- XSchem’s menu bar says IHP. What’s wrong, and which two checks tell you it’s fixed?
- You typed
W=2uon a transistor. Which tool complains, and what does the message say? - Two wires cross on the canvas, with no dot at the crossing. Are they connected?
- A device line reads
XM1 d net3 0 0 .... Which terminal is unconnected? - You netlisted a schematic in a folder with no
xschemrc. Where did the netlist go, and what happens to it when the container is removed?
Next: Lab 01: Your first schematic.