Lab 01: Your first schematic
You’ll load the course, draw one transistor in XSchem, watch it become seven lines of SPICE, and get a current out of it. Then you’ll break the same circuit twice on purpose. The first mistake is loud enough that ngspice refuses to run, and the second is so quiet that ngspice hands you a wrong answer without any error.
Package: labs/lab-01-first-schematic/
Before you start
- Read Getting started.
- Keep the XSchem cheat sheet open in another tab.
Time: about 2 hours, most of it learning XSchem, not counting the optional Part 8. Each make target takes about ten seconds, and almost all of that is ngspice loading the SKY130 models.
Part 1: Load the course
If you haven’t set up the workbench yet, do IC101 Lab 03 first.
Start the desktop from your
workspaceclone (./scripts/start_vnc.sh, orscripts\start_vnc.baton Windows), open http://localhost/, and open a terminal on that desktop. Every command from here on goes in that terminal, not on your laptop.Load the course environment. Do this in every new terminal:
. /foss/designs/common/.designinitASIC-EDU: PDK=sky130A PDK_ROOT=/foss/pdks designs=/foss/designs run 'mod' to list course modules, or 'mod <name>' to enter one.Check that the banner says
PDK=sky130A(echo $PDKprints the same thing). The image’s own default isihp-sg13g2, which is the wrong process for this course, so this is the line that tells you the script worked.Get the course files:
mod add ad103      # first time only: clones github.com/uoftasic/ad103
mod ad103          # every time after that
Cloning https://github.com/uoftasic/ad103.git into /foss/designs/modules/ad103 Cloning into '/foss/designs/modules/ad103'... OK module ready: /foss/designs/modules/ad103 run: mod ad103 cwd: /foss/designs/modules/ad103What you see What it means bash: mod: command not foundYou did not run step 2 in this terminal. mod: no such module: ad103You ran mod ad103beforemod add ad103.fatal: could not read Username for 'https://github.com'git couldn’t read the repository without logging in. Check the spelling of the module name, and if it’s right, ask in Discord. Don’t type your password. Check the tool versions:
xschem --version
ngspice -v
You should see PDK=sky130A in the banner from step 2, then XSCHEM V3.4.8RC and ngspice-47 at the top of the two version outputs. The course is pinned to these versions because XSchem’s keys and menus have changed between releases, and with a different version the screenshots may not match your window. For problems with the desktop or the container, see IC101’s Troubleshooting page.
Part 2: Prove the toolchain works
Does your workbench give the reference answer, and what does a SPICE device line say?
Run the reference check:
cd /foss/designs/modules/ad103/labs/lab-01-first-schematic
make
== netlisting xschem/nmos_probe.sch wrote xschem/simulation/nmos_probe.spice == simulating spice/nmos_op.spice wrote results/nmos_op.log == checking device line : XM1 d g 0 0 sky130_fd_pr__nfet_01v8 L=0.15 W=1 nf=1 ad=0.29 as=0.29 pd=2.58 ps=2.58 nrd=0.29 nrs=0.29 sa=0 sb=0 sd=0 mult=1 drain current : 501.046 uA (reference 501.046 uA) PASS netlist and operating point match the reference runRead the device line first, before you look at the current.
makenetlistsxschem/nmos_probe.schand prints the device line from that netlist, but the drain current comes from simulating a separate, hand-written deck,spice/nmos_op.spice. The four node names,d g 0 0, are in the order drain, gate, source, body, and you’ll find each of them on the drawing in Part 3.Open
results/nmos_op.logand findi(vds) = -5.01046e-04. On some builds of the image the log opens with severalError opening osdi liblines; they are harmless, and Harmless messages says why.The transistor is conducting, so why is the current negative?
TipAnswerngspice reports the current flowing into the positive terminal of a source.
Vdsis pushing current out of that terminal, so the number comes out negative.
You should see PASS and 501.046 µA. That is a real SKY130 NMOS, one micrometre wide and 150 nanometres long, with 1.8 V on both the gate and the drain: half a milliamp through a device you could fit two thousand of across the width of a human hair. Lab 03 explains why it carries that particular current.
make doesn’t need any environment setup, because the Makefile sets PDK=sky130A itself, so it works in a bare container even if Part 1 went wrong. That makes it a useful check for the rest of the course: if a page seems to disagree with your screen, come back here and run make. If it prints PASS, your toolchain is fine and the problem is in your drawing.
Part 3: Look around the reference schematic
What does XSchem write when you press Netlist, and where does each line come from on the drawing?
Open the reference schematic from its own folder, so XSchem reads that folder’s
xschemrc:cd xschem xschem nmos_probe.sch &Check the menu bar says SKY130. If it says IHP, close XSchem, run step 2 of Part 1 in this terminal, and launch it again. Other ways XSchem can fail, most of them without any error, are listed under Failures that exit 0.
Learn the keys you need. XSchem has 154 key bindings, but the ones in this table cover everything in the course. They’re taken from XSchem’s own list, which you can open with Help → Keys, or with
/for a full-screen poster.Do this Key Zoom to fit fZoom in / out mouse wheel, or Shift-Z/Ctrl-ZPan hold Spaceand drag, or drag with the middle buttonInsert a symbol Shift-I(orIns)Draw a wire w: press it at one end, then click the otherDraw a wire whose ends snap onto the nearest pin Shift-W, and holdShiftfor the closing click tooPlace a net label Alt-LEdit the selected thing’s properties qDuplicate / move / delete selection c/m/DeleteUndo uSave Ctrl-SAbort whatever you started, and unselect EscapeHelp ?Three of these will catch you out, because your text editor uses the same keys for something else.
cduplicates the selection (plainCtrl-Cis a different, less useful copy),uis undo (Ctrl-Zzooms out), andqopens the properties editor rather than quitting. The full list, with menu equivalents, is in the XSchem cheat sheet.Pan and zoom around
nmos_probe.schuntil it stops looking random. Find the two supplies, the netsgandd, and the junction dot where the source and body wires meet. Compare it with the picture in Getting started.Warning:
nmos_probe.schis the lab’s reference, andmakechecks against it. Practise on it freely (uundoes any number of steps), but don’t save over it. If you already did, rungit checkout -- xschem/nmos_probe.schfrom the lab folder to put it back.The status bar at the bottom of the window is where XSchem tells you what mode you’re in. If it’s hidden behind the taskbar, see Windows that open off screen.
Open the Simulation menu and check the bullet is on Use ‘simulation’ dir in schematic dir. The lab’s
xschemrcsets this, so it should already be on. While the menu is open, tick Show netlist after netlist command (Shift-A).Click Netlist in the menu bar; it’s the grey button to the right of
SKY130. The netlist pops up in its own window.In the terminal, still in the
xschem/folder, print the file XSchem wrote:cat simulation/nmos_probe.spice** sch_path: /foss/designs/modules/ad103/labs/lab-01-first-schematic/xschem/nmos_probe.sch **.subckt nmos_probe XM1 d g 0 0 sky130_fd_pr__nfet_01v8 L=0.15 W=1 nf=1 ad=0.29 as=0.29 pd=2.58 ps=2.58 nrd=0.29 nrs=0.29 sa=0 sb=0 sd=0 mult=1 Vgs g 0 1.8 Vds d 0 1.8 **.ends .end
You should see the seven-line netlist above, with d g 0 0 on the device line matching the nets on the drawing.
Part 4: Draw your own transistor
Can you draw the reference circuit yourself, with a transistor twice as wide? You start from xschem/my_probe.sch, which is the same circuit with the transistor left out.
Go back to the lab folder and open it:
cd ..
make edit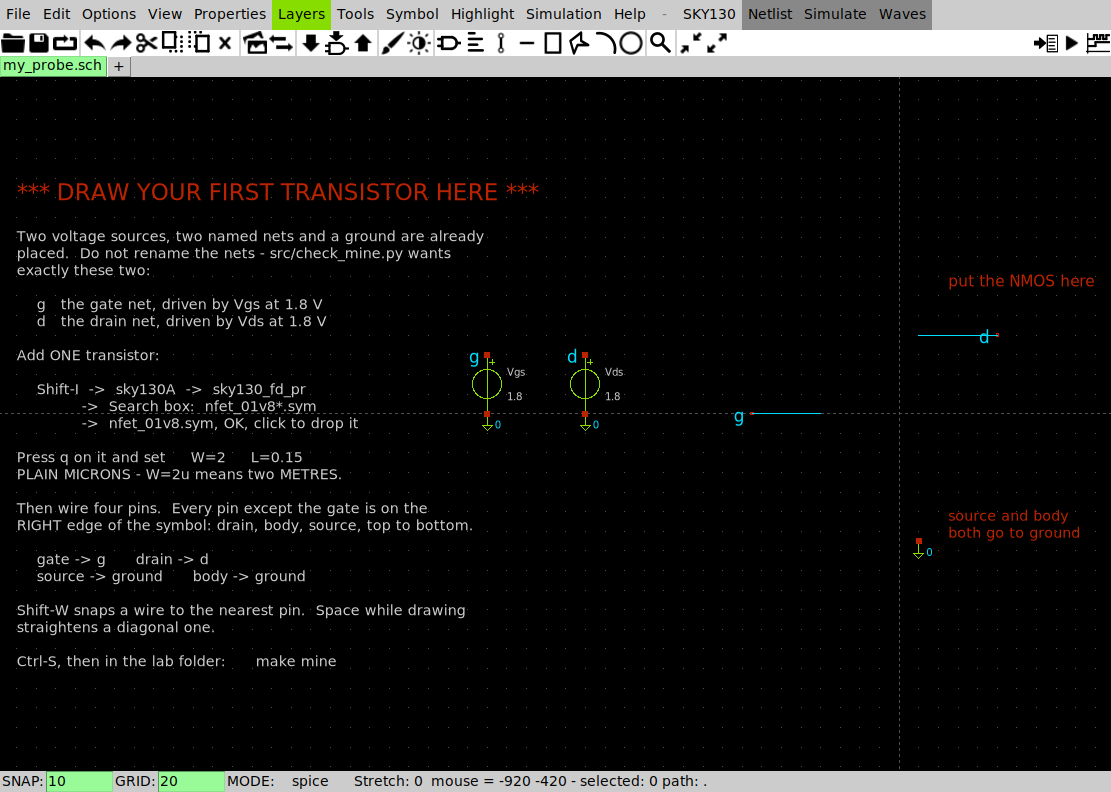
xschem/my_probe.sch — the two supplies, the two nets, and a gap where the transistor goes Everything except the transistor is already placed and wired.
VgsandVdsare both 1.8 V, and they’re connected by net name rather than by wire: any twolab_pins with the same label are the same net, wherever they sit on the page. The status bar readsSNAP: 10 GRID: 20 MODE: spice.Press
Shift-I. The symbol chooser opens: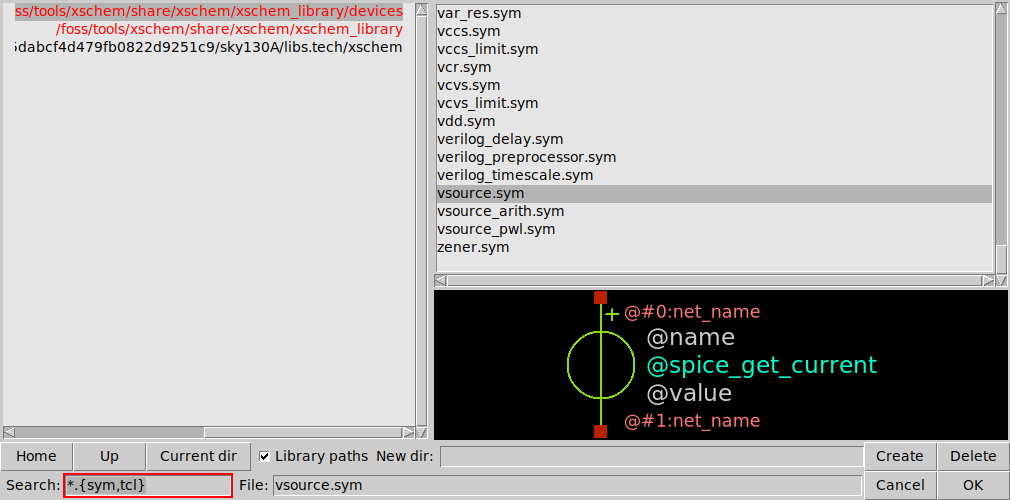
XSchem’s symbol chooser, opened with Shift-I The left pane lists the symbol libraries XSchem knows about, and the right pane shows the current directory. Search filters the file list by a pattern. When you pick a file (
vsource.symhere), the pane underneath draws the symbol, so you can check you have the right one before you place it. Press OK, or double-click the file, and the symbol attaches to your cursor; click to drop it.Look at the left pane first, because it gives you a second check on the PDK. Three paths are listed, and the third is
…/sky130A/libs.tech/xschem. If that line is missing or saysihp-sg13g2, close XSchem and go back to Part 1, step 2.The right pane opens on XSchem’s built-in
deviceslibrary. You need four things from it during the course:vsource.sym(a voltage source),gnd.sym(ground),lab_pin.sym(a net label), andcapa.sym(a capacitor).On a desktop 1280 pixels wide, the chooser opens mostly off the right edge of the screen, with OK out of view. Drag it back by the part of the title bar you can see; Windows that open off screen has the details.
Click the
sky130Aline on the left, opensky130_fd_pr, and replace the Search text withnfet_01v8*.sym. That cuts the library’s 77 symbols down to five. Search takes a glob pattern rather than a substring, sonfeton its own matches nothing.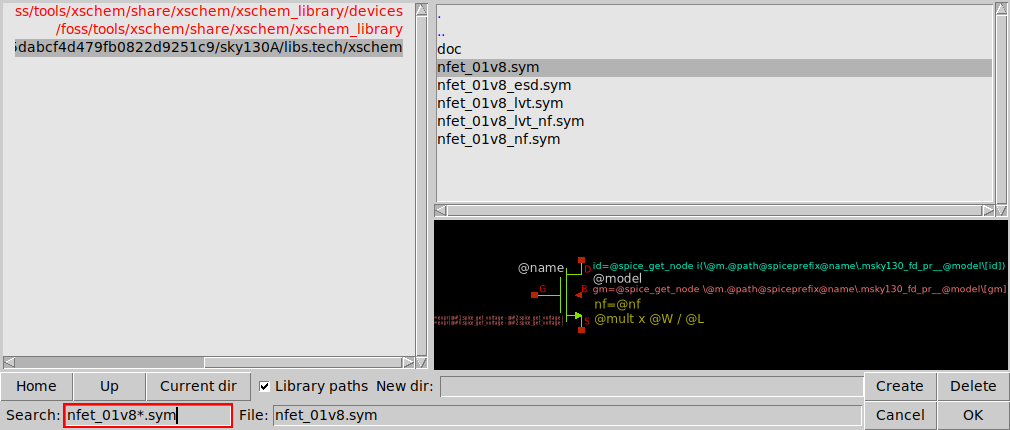
The symbol chooser in sky130_fd_pr with the Search box reading nfet_01v8*.sym and five files listed The search has cut the whole
sky130_fd_prlibrary down to five files. The preview shows the symbol with its attributes still as placeholders (@name,@model,@mult x @W / @L), because they’re filled in separately for each instance.The three symbols you’ll use in this course are
nfet_01v8.sym(the 1.8 V n-channel MOSFET, the workhorse of this process),pfet_01v8.sym(its p-channel twin) anddiode.sym(Lab 02’s subject). The other seventy-odd devices are described in Reading a SKY130 device model.Pick
nfet_01v8.sym, press OK, and click to drop it in the gap.Select the transistor and press
q: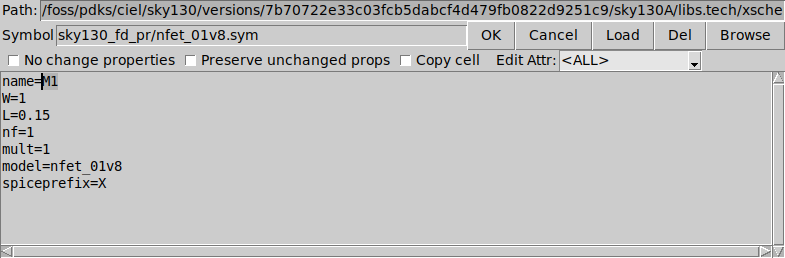
The XSchem property editor on an nfet_01v8 instance The editor shows one attribute per line.
W=1andL=0.15are the only two you’ll normally change;nf,mult,modelandspiceprefixcome from the symbol, so leave them alone.Set
W=2andL=0.15, as plain numbers with nouafter them.Wire the four pins: drain to
d, gate tog, source and body to ground. To draw a wire, put the pointer on the first end, pressw, move to the second end, and click. It’s the key, not a click, that sets the start of the wire. So if you presswand then click in two places, you get a wire from wherever the pointer was sitting when you pressedwto your first click, and nothing between the two places you clicked. Each wire is one straight segment, so for an L-shape you draw two.Two things often cost new users their first half hour:
- Your wires may come out diagonal. XSchem’s routing mode has an oblique setting, and it isn’t always switched off. Press
Spacewhile a wire is in progress to cycle between horizontal-then-vertical, vertical-then-horizontal, and straight diagonal.Escapethrows away a wire you started by mistake. - A wire end can miss a pin by one grid step. If you’re not sure a wire will land on a pin, use
Shift-Winstead ofw, and holdShiftdown for the closing click as well.Shift-Wsnaps the end you start from onto the nearest pin or net endpoint, however far away it is. Unless you holdShift, the click that finishes the wire is an ordinary click: it lands on the snap grid, and it only pulls onto a pin that’s already within about one snap step of it, which is why the mistake comes and goes. We measured it on a pin 28 units away: a plain closing click landed on the grid 28 units short of the pin, and withShiftheld it landed exactly on it.
Zoom in on every junction and check for the dot.
- Your wires may come out diagonal. XSchem’s routing mode has an oblique setting, and it isn’t always switched off. Press
Save with
Ctrl-S. XSchem always answers with a small window titled Ask Save, which askssave file?and offers Yes / Cancel / No, and it puts that window wherever the pointer happens to be. Nothing reaches the disk until you press Yes (orReturn), and the tab title keeps its*until you do. XSchem has no autosave, so save often.Warning: if you press
Ctrl-S, miss the Ask Save window, and runmake mine, you check the last version you saved, which is usually the one with no transistor in it. That gives you a confidentFAIL - the netlist has no nfet_01v8, which sends you hunting for a placement bug that isn’t there. Check that the*has gone from the tab before you runmake mine.
You should see an nfet_01v8 in the gap with W=2 and L=0.15, no hollow square on any wire end or pin, a dot where the source and body wires meet, and no * in the tab title.
Part 5: Simulate your drawing
Does a transistor twice as wide carry twice the current?
Predict the current before you simulate. The reference device has \(W\) = 1 µm and draws 501.046 µA, and yours is twice as wide. Write your number down.
Netlist, check and simulate your drawing:
make mineIt netlists what you drew and checks the wiring before it simulates anything:
  WHAT YOU DREW
    XM1 d g 0 0 sky130_fd_pr__nfet_01v8 L=0.15 W=2 nf=1 ad=0.58 as=0.58 pd=4.58 ps=4.58 nrd=0.145 nrs=0.145 sa=0 sb=0 sd=0 mult=1

  Wired correctly. Simulating it.

  YOUR TRANSISTOR
    W = 2 um, L = 0.15 um, V_GS = V_DS = 1.8 V
    drain current    1030.4200 uA
    reference        1030.4200 uA

PASS  you drew a transistor, XSchem turned it into SPICE, and ngspice
      answered 1030.4200 uA. That is the whole chain, and it is the
      chain every other lab in this course runs on.

  One more thing before you leave. The reference schematic is W=1 and
  draws 500.9410 uA. Yours is twice as wide. Twice 500.9410 is
  1001.8820, and you measured 1030.4200 - +2.85 %.
  Small, and not zero, and not noise. Lab 04 is entirely about that gap.
If it says
FAIL, it tells you which of five things went wrong (a missing device, a unit suffix onW, anet7where a wire didn’t land, the source on the wrong node, or the body left floating) and what to do about it.Compare the result with your prediction. The note at the end compares your current with twice the reference schematic’s 500.9410 µA. What does the +2.85 % say about the rule “current is proportional to \(W\)”?
TipAnswerDoubling the width gave slightly more than double the current. The difference is too small to be a mistake and too large to be noise, so the rule holds only approximately. This is the first crack in “current is proportional to \(W\)”, and Lab 04 is about what’s behind it.
The hand-written deck in Part 2 gave 501.046 µA for the reference device, and the XSchem netlist gives 500.941 µA. Both are correct. Compare the device line in Part 2’s
makeoutput with the one inspice/nmos_op.spice. What makes them differ by 0.02 %?TipAnswerThe symbol computes the source and drain diffusion areas and resistances from \(W\) (
ad,as,pd,ps,nrd,nrs) and writes them onto the device line, while the hand-written deck leaves them at zero. This is the first time in the course that layout shows up in an electrical answer, and here the effect is small.
You should see PASS and 1030.4200 µA from make mine.
Part 6: Units on W and L
What does ngspice say when W and L carry a unit suffix?
Run the deck with units on
WandL:make wrong-unitsError on line 56 or its substitute: m.xm1.msky130_fd_pr__nfet_01v8 d g 0 0 xm1:sky130_fd_pr__nfet_01v8__model l= 1.500000000000000e-07 w= 1.000000000000000e-06 ... could not find a valid modelname Simulation interrupted due to error!Find what changed:
diff spice/nmos_op.spice spice/nmos_op_wrong_units.spice
You should see that the two decks differ by two characters: L=0.15u W=1u instead of L=0.15 W=1. Getting started explains what the u does.
The error message doesn’t mention W or units. So when you see could not find a valid modelname, what should you check first?
Check W and L first, before you try to make sense of the error. The message doesn’t point at them, so checking them has to become a habit.
Part 7: A gate wire that stops short
What does ngspice do with a gate wire that stops short of the pin?
Predict: will ngspice stop with an error, as it did in Part 6? Write down your guess.
Run the schematic with one short wire:
make unconnectedXSchem exit status: 0. No error, no warning. Here is the device line: XM1 d net1 0 0 sky130_fd_pr__nfet_01v8 L=0.15 W=1 nf=1 ... Note: Starting dynamic gmin stepping Warning: Dynamic gmin stepping failed Note: Starting true gmin stepping Warning: True gmin stepping failed Note: Starting source stepping Warning: source stepping failed Note: Transient op started Note: Transient op finished successfully i(vds) = -7.34593e-08 v(net1) = 5.017472e-01Open the broken schematic in its own window and compare it with
nmos_probe.sch(open that too if you closed it after Part 3):cd xschem xschem broken_probe.sch &Find the difference. It’s a single wire that ends 20 units short of the gate pin, which is about a millimetre on screen.
Compare the current with Part 2’s 501.046 µA. By what factor is it wrong?
v(net1) = 5.017472e-01is the gate.Vgsis still in the circuit and still set to 1.8 V. Why is the gate at 0.50 V?TipAnswerBecause the wire stops short, the gate is floating, so its voltage settles wherever the solver happened to leave it.
Vgsis still there and still drives the netg, butgno longer reaches the gate.Go back to the lab folder and search the netlists for invented names:
cd ..
grep 'net[0-9]' xschem/simulation/*.spice
You should see ngspice print an answer, 73.4593 nA, with no error anywhere, even though the answer is wrong by a factor of 6821. The grep finds the broken_probe device line with net1 on it. Apart from that, the only warning you got was three lines of solver complaints, which look exactly like the noise you learn to scroll past. That’s why we ask you to run that grep after every netlist for the rest of the course: any match is a wire you believe is connected but isn’t.
Part 8 (optional): Your device’s model bin
Ask ngspice which model card it chose for
L=0.15 W=1:make binsmodel xm1:sky130_fd_pr__nfe toxe 4.148e-09 vth0 0.411231 lmin 1.5e-07 wmin 8.4e-07 model xm1:sky130_fd_pr__nfe l 1.5e-07 w 1e-06 vth 0.769267 weff 9.56282e-07 leff 1.26136e-07
You should see two model headers. Everything above the second one is the bin, and everything below it is your device. Reading a SKY130 device model explains each line, including why leff is 16 % shorter than the L you drew.
Finishing
You’re done when make mine prints PASS and 1030.4200 uA for the transistor you drew in Part 4.
Questions
Answer these without looking anything up. Each one points to where the lab answered it.
- How do you set
WandLon annfet_01v8, and what goes wrong if you writeW=1u? (Part 4, step 5, and Part 6.) - How do you draw a wire that isn’t diagonal, and make sure it lands on a pin? (Part 4, step 6.)
- How do you connect two things by net name alone? (Part 4, step 1, and the key table in Part 3.)
- Where does XSchem write the netlist when you press Netlist? (Part 3, steps 5 to 7.)
- What are the four node names on a device line, in order, and what does a
net7on it mean? (Part 2, step 2, and Part 7.)
Submit
Nothing to submit.
Next on the Course path: read Linearity and superposition.